Chapter 10: Plane shapes
A closed, two-dimensional or flat figure is called a plane shape. A plane shape has length and breadth, but no thickness.
You have learnt about squares, rectangles, trapeziums, triangles and circles in previous years. These are examples of plane shapes.
In this chapter we will look at three more plane shapes: the parallelogram, the rhombus, and the kite. All three are quadrilaterals, because they each have four sides and four angles.
10.1 Properties of the parallelogram, rhombus and kite
Sides, angles and diagonals of a parallelogram
-
A parallelogram is a quadrilateral with both pairs of opposite sides parallel and equal.
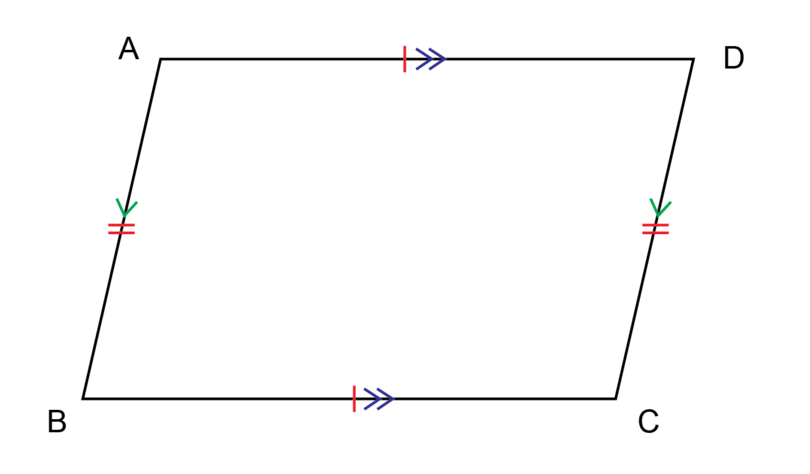
In parallelogram :
- = and =
- and
-
A parallelogram has two pairs of equal opposite angles.

In parallelogram :
- =
- =
-
The diagonals of a parallelogram bisect each other.
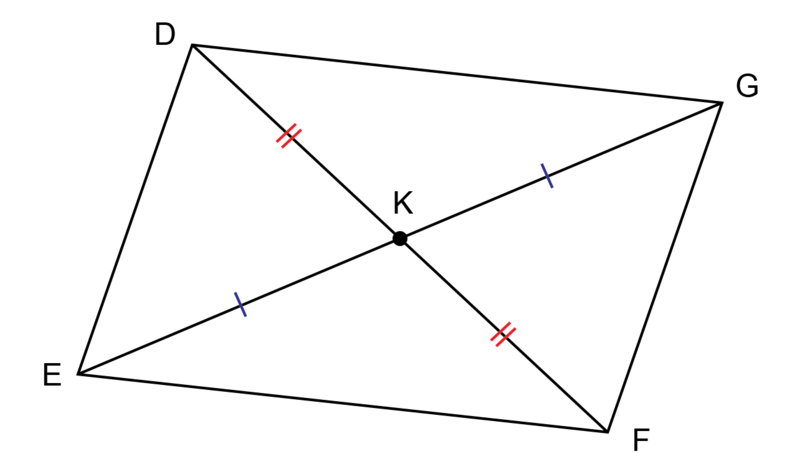
In parallelogram :
- diagonals and intersect at point
- = and =
parallelogram A parallelogram is a quadrilateral with two pairs of opposite sides equal and parallel. A parallelogram has two pairs of opposite angles that are equal.
bisect To bisect is to cut exactly in half.
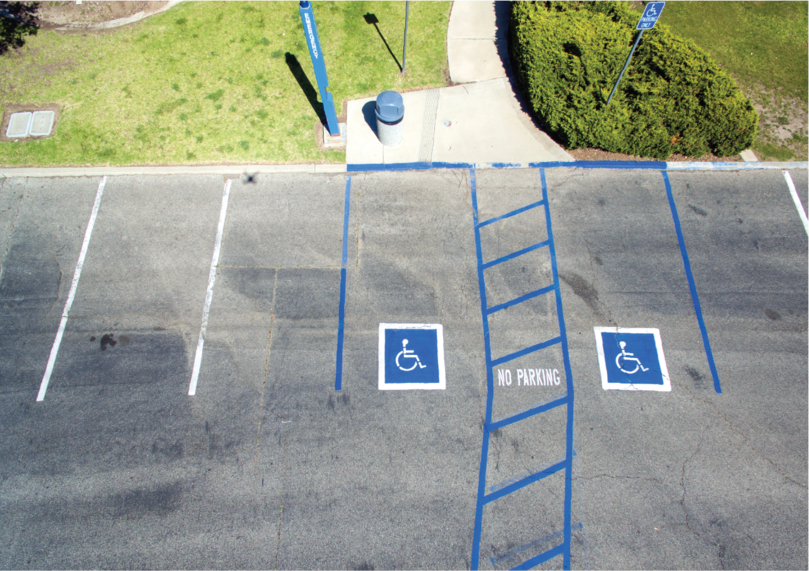
Keep your eyes open and look out for parallelograms in your environment. For example, the lines painted in an area where cars are not allowed to park form parallelograms.
Sides, angles and diagonals of a rhombus
-
A rhombus is a quadrilateral with four equal sides. The two pairs of opposite sides are parallel to each other.
In rhombus :
- = = =
- and
-
A rhombus has two pairs of equal opposite angles.

In rhombus :
- =
- =
-
The diagonals of a rhombus bisect each other at right angles (perpendicularly).

In rhombus \(RQPS\):
- diagonals and intersect at point
- = and =
- , so all four angles at point are right angles
A rhombus is a special parallelogram. A rhombus has all the properties of a parallelogram, but also, all four sides are equal in length.
Remember that the symbol means 'perpendicular'.
rhombus A rhombus is a quadrilateral with four equal sides. Opposite sides are equal and parallel. A rhombus has two pairs of opposite angles that are equal.
Keep your eyes open and look out for rhombuses in your environment. For example, You can tile a wall or a floor with tiles that are rhombuses.

Sides, angles and diagonals of a kite
A kite is a quadrilateral with two equal short sides and two equal long sides. The two short sides are adjacent and the two long sides are adjacent.
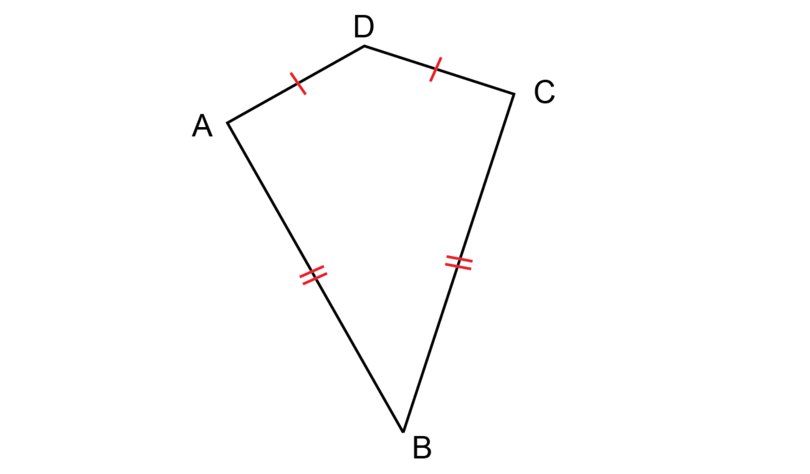
In kite :
- and are adjacent sides, because and are next to each other and they share a common vertex ; =
- and are adjacent sides, because and are next to each other and they share a common vertex ; =
adjacent Sides or angles that are adjacent lie next to each other, so they have a common vertex.
One pair of opposite angles of a kite are equal.

In kite :
- is the angle between a long side and a short side
- is the angle between a long side and a short side
- =
The angle included between the two shorter sides is not equal to the angle included between the two longer sides.
The long diagonal of a kite bisects the short diagonal at right angles (perpendicularly). Only the short diagonal is bisected.

In kite :
- diagonals and intersect at point
- =
kite A kite is a quadrilateral with two shorter adjacent sides and two longer adjacent sides. A kite has only one pair of opposite angles equal to each other.
Keep your eyes open and look out for kites in your environment. For example, on a windy day you may see a kite in the sky.

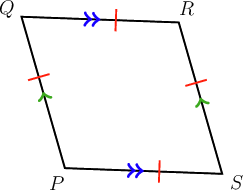
Worked example 10.1: Identifying plane shapes
You are given the following diagram:
Give the most specific name for the figure.
-
Step 1: Study the diagram and identify the properties.
This polygon has four sides, so it is a quadrilateral. It is given that two pairs of sides are parallel and all four sides are equal.
-
Step 2: Select the most specific name for the shape shown and give the answer.
A rhombus is a quadrilateral with two pairs of opposite sides parallel and all four sides equal.
Answer: This quadrilateral is a rhombus.
The shape is also a parallelogram and a quadrilateral. The question, however, asked for the most specific name for the shape.
Exercise 10.1: Work with plane shapes
-
You are given the following diagram:
Give the most specific name for the figure.
This figure has four sides, so it is a quadrilateral. The quadrilateral has two pairs of opposite sides parallel and equal.
So, this quadrilateral is a parallelogram.
-
The following diagram is given:
Give the most specific name for the figure.
This figure has four sides, so it is a quadrilateral. The quadrilateral has two pairs of parallel sides and four equal sides.
The figure is a rhombus.
The shape is also a parallelogram and a quadrilateral. The question, however, asked for the most specific name for the shape.
-
The following diagram is given:
Give the most specific name for the figure.
This figure has four sides, so it is a quadrilateral.
The quadrilateral has two equal short adjacent sides and two equal long adjacent sides.
The figure is a kite.
-
Say whether the following statement is true or false. A parallelogram, a rhombus and a kite each have two pairs of opposite angles that are equal.
A parallelogram and a rhombus have two pairs of opposite angles that are equal.
A kite has only one pair of opposite angles that are equal.
So, the statement is false.
-
Say whether the following statement is true or false.
The diagonals of a parallelogram and a rhombus bisect each other.
The statement is true.
-
Say whether the following statement is true or false.
The diagonals of a kite bisect each other perpendicularly.
One diagonal of a kite bisects the other diagonal at a right angle (perpendicularly). Only one diagonal is bisected.
The statement is false.
-
Say whether the following statement is true or false. The diagonals of a rhombus and a kite intersect each other at right angles.
The statement is true.
-
Give your own example of an example of a parallelogram in your environment.
Students will give their own examples. One example is given below.
One side surface of a certain type of eraser is in the shape of a parallelogram.
-
Give your own example of an example of a rhombus in your environment.
Students will give their own examples. One example is given below.
The pattern on a piece of material may include rhombuses.
-
Give your own example of an example of a kite in your environment.
Students will give their own examples. One example is given below.
A person may design a garden in the form of a kite.
10.2 Scale drawings
A scale drawing is a diagram on which a real object (for example, a book or a table) is drawn bigger or smaller while keeping the same proportions.
Architects use scale drawings when they design or plan buildings. For example, when you want to build a house, you need a floor plan of the house. It is not possible to draw a diagram of the floor plan of a house on paper at its actual size, because a house is too big! So, you reduce every measurement in the same proportion, and then you can fit the diagram onto a sheet of paper.
A scale drawing has to show clearly what ratio was used to enlarge or reduce the object. This ratio is called the scale of the drawing.
- A ratio of means that 1 unit on the scale drawing represents 10 units in real life. For example, 1 cm on the scale drawing represents 10 cm in real life.
- A ratio of means that 1 unit on the scale drawing represents 700 units in real life. For example, 1 mm on the scale drawing represents 700 mm in real life.
scale drawing A scale drawing is a diagram of a real object where every measurement is reduced (or enlarged) in the same proportion.
scale The scale of a scale drawing states the ratio in which the real life object was reduced (or enlarged) on the scale drawing.
There are two types of calculations that we do when we draw scale diagrams:
- We convert real measurements to measurements we can use to draw a scale drawing.
- We convert the measurements given on a scale drawing to the real measurements.
Convert real measurements to scale drawing measurements
If you know the measurements of a real object, you can draw a scale drawing of the object.
In order to draw a scale drawing, you need two pieces of information:
- Firstly, you need to know the actual measurements of everything that has to go onto the scale drawing.
- Secondly, you need to know what scale you have to use. The scale will depend on the original measurements, how much detail the scale drawing has to show, and the size of the scale drawing.
Worked example 10.2: Converting real measurements to scale drawing measurements
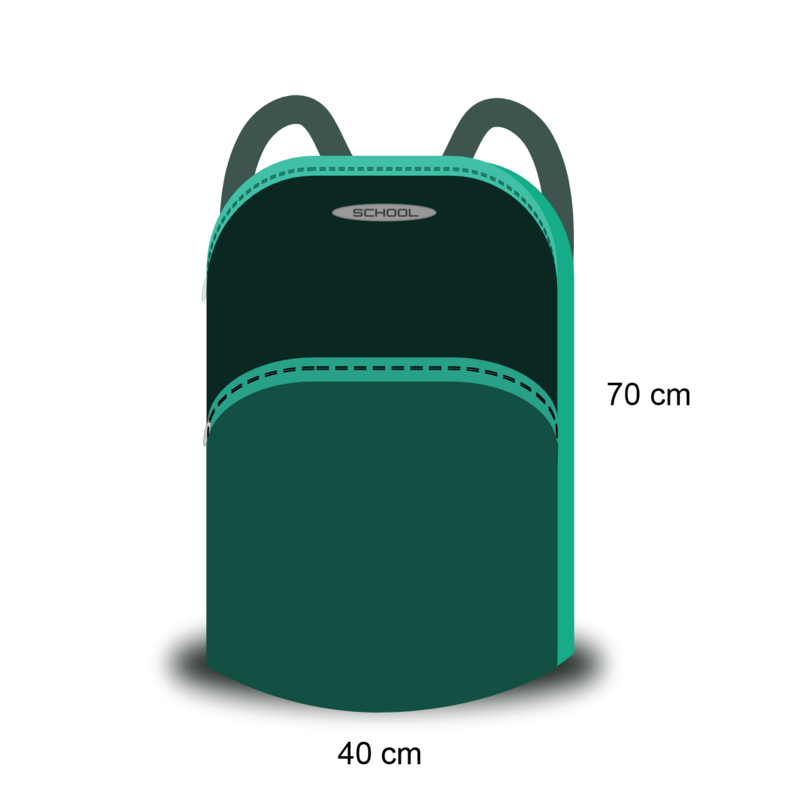
The diagram below shows a school bag.
Draw a scale drawing of the school bag. Use a scale of .
-
Step 1: Consider the diagram and take note of the information given.
The diagram shows that the height of the school bag in real life is 70 cm.
The diagram shows that the width of the school bag in real life is 40 cm.
-
Step 2: Use the given scale to convert each measurement.
The given scale is \(1:10\), so 1 cm on the scale drawing represents 10 cm in real life.
Or, 10 cm in real life represents 1 cm on the scale drawing.
Height:
\[ \begin {align} \text{Height of the bag in real life} & = \text{70 cm}\\ \text{So, height of the bag on scale drawing} & = \text{70 cm} \div 10\\ &= \text{7 cm} \end{align}\]Width:
\[ \begin {align} \text{Width of the bag in real life} &= \text{40 cm}\\ \text{So, the width of the bag on scale drawing} & = \text {40 cm} \div 10\\ &= \text{4 cm} \end{align}\] -
Step 3: Make an accurate scale drawing. Remember to add the scale to the diagram.

It is possible that the solution given above does not display correctly on your device. The accurate scale drawing should have the measurements as given in the diagram in Step 3.
Without a scale, a scale drawing has no value. You need the scale to work out the actual size of the object shown in the scale drawing.
Exercise 10.2: Convert real measurements to do a scale drawing
-
Umar enjoys writing stories about his family. He has a special notebook for the stories. The diagram below shows Umar's notebook.
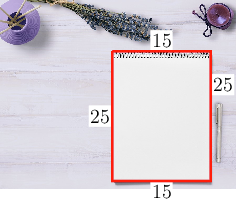
The length of the book is 25 cm and the width of the book is 15 cm.
Make a scale drawing of Umar's book. Use a scale of .
The given scale is , so 1 cm on the scale drawing represents 5 cm in real life.
Or, 5 cm in real life should be shown as 1 cm on the scale drawing.
Length:
\begin {align} \text {Length of the book in real life} & = \text{25 cm}\\ \text {So, length of the book on scale drawing} & = \text{25 cm} \div 5\\ &= \text{5 cm} \end {align}Width:
\begin {align} \text{Width of the book in real life}& = \text{15 cm}\\ \text{So, width of the book on scale drawing}& = \text{15 cm} \div 5\\ & = \text{3 cm} \end {align}
It is possible that the solution given above does not display correctly on your device. The accurate scale drawing should have the measurements as shown above.
-
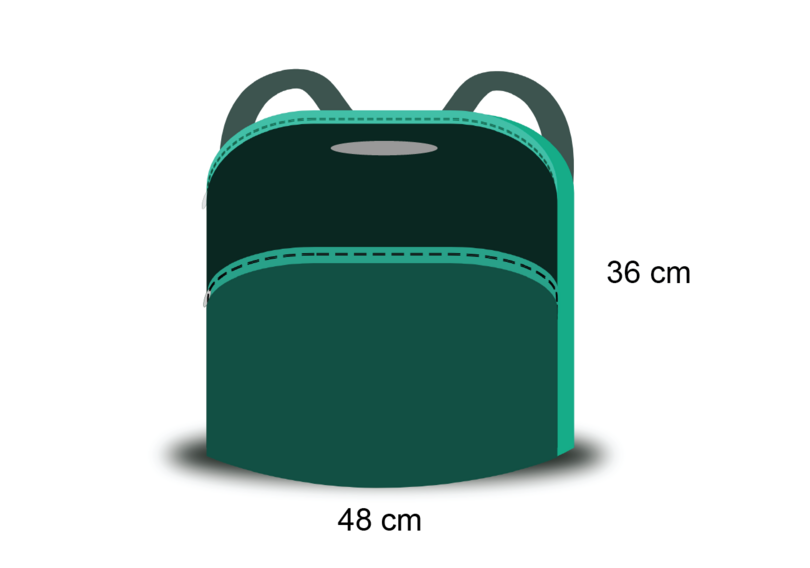
The diagram shows a travelling bag with the following dimensions:
- Height of bag: 36 cm
- Width of bag: 48 cm
Draw a scale drawing of the travelling bag. Use a scale of .
The given scale is , so 1 cm on the scale drawing represents 6 cm in real life.
Or, 6 cm in real life represents 1 cm on the scale drawing.
Height:
\begin {align} \text {Height of the bag in real life}& = \text{36 cm}\\ \text {So, height of the bag on scale drawing}& = \text{36 cm} \div 6\\ &= \text{6 cm} \end {align}Width:
\begin {align} \text {Width of the bag in real life} & = \text{48 cm}\\ \text {So, width of the school on scale drawing} & = \text{48 cm} \div 6\\ &= \text{8 cm} \end {align}
It is possible that the solution given above does not display correctly on your device. The accurate scale drawing should have the measurements as shown above.
-
Work with a classmate. Identify three objects in your classroom that you can measure, for example, the door, a tile on the floor, a window pane or the top of your desk.
Use a ruler to measure the three objects.
Decide on a suitable scale for each object and make three scale drawings.
Students will give their own examples. One example is given below.
Object to measure: top of the teacher's table.
Measurements:
- Length of table = 150 cm
- Breadth of table = 90 cm
Scale:
Calculations:
- Length:
- Breadth:
Scale drawing:

It is possible that the solution given above does not display correctly on your device. The accurate scale drawing should have the measurements as shown above.
Convert scale drawings to real measurements
If you have a scale drawing of an object, you can calculate the actual measurements of the object.
Remember, the scale is expressed as a ratio, for example .
This simply means that 1 unit on the scale drawing represents 50 units in real life.
So 1 cm on the scale drawing will represent 50 cm in real life, or 1 mm on the scale drawing will represent 50 mm in real life.
Worked example 10.3: Converting a scale drawing to real measurements
The diagram below shows a scale drawing of a classroom. Study the scale drawing and answer the questions that follow.
The scale of this plan is given as . Use your ruler to measure the width and the length of the diagram of the classroom. Then calculate the real dimensions of the classroom.
It is possible that your device does not display the diagram correctly. The measurements given in the solution are the expected measurements.
-
Step 1: Measure the width of the classroom.
Use your ruler and measure the width, which is the shorter side of the diagram.
The classroom is 10.5 cm wide on the scale drawing.
-
Step 2: Use the given scale to calculate the width of the classroom in real life.
-
Step 3: Measure the length of the classroom.
Use your ruler and measure the length, which is the longer side, or the distance from the blackboard to the wall behind students , and .
The classroom is 15 cm long on the scale drawing.
-
Step 4: Use the given scale to calculate the length of the classroom in real life.
So, in real life the classroom is 750 cm (or 7.5 metres) long and 525 cm (or 5.25 metres) wide.
Remember that there are 100 cm in a metre, so 100 cm = 1 m.
IMPORTANT
When we do scale drawings we have to measure accurately the lengths of line segments on diagrams. It is possible that the given diagrams do not display correctly on your device. Then you will not be able to measure the lengths of the line segments as expected.
To assist you, in the exercise below we will give you the expected measurements in each question. If your device does not display the diagram correctly, you can use these measurements to do the necessary calculations.
Exercise 10.3: Convert a scale drawing to real measurements
-
The diagram below shows a scale drawing for a plan of a classroom.

The scale of this plan is given as . Use your ruler and calculator to find the dimensions of the teacher's desk in real life.
Expected measurements: length of desk = 4.5 cm, and width of desk = 2 cm
Length:
\begin {align} \text {Length of the desk on scale drawing}& = \text{4.5 cm}\\ \text {So, length of the desk in real life} & = \text{4.5 cm} \times 50\\ &= \text{225 cm} \end {align}Width:
\begin {align} \text {Width of the desk on scale drawing} &= \text{2 cm}\\ \text {So, width of desk in real life} & = \text{2 cm} \times 50\\ &= \text{100 cm} \end {align}The dimensions of the teacher's desk in real life are 225 cm 100 cm.
-
You measure the distance between two buildings on a scale drawing to be 5 cm.
If the scale drawing has a scale of , what is the actual distance between the two buildings on the ground?
\begin {align} \text {Distance on scale drawing} & = \text{5 cm}\\ \text {So, distance in real life} & = \text{5 cm} \times 100\\ &= \text{500 cm} \end {align}
The actual distance between the two buildings is 500 cm (or 5 metres).
-
You are given a scale drawing with the scale .
You measure a distance of 12 cm on the scale drawing. What is the actual distance in real life?
\begin {align} \text {Distance on scale drawing} & = \text{12 cm}\\ \text {So, distance in real life} & = \text{12 cm} \times 20\\ &= \text{240 cm} \end {align}
-
The diagram below shows a scale drawing of a dining room with furniture. Use this diagram to answer the questions that follow.

- Use the given scale to calculate the actual (real) size of the dining room table.
Expected measurements: length of table = 8 cm, and width of table = 5 cm
\begin {align} \text {Length of table on scale drawing}& = \text{8 cm}\\ \text {So, length of table in real life} &= \text{8 cm} \times 30\\ &= \text{240 cm} \end {align} \begin {align} \text {Width of table on scale drawing} & = \text{5 cm}\\ \text {So, width of table in real life} & = \text{5 cm} \times 30\\ &= \text{150 cm} \end {align}
The dimensions of the dining room table in real life are 240 cm 150 cm.
- Use the given scale to calculate the actual (real) size of the chairs.
Expected measurements: length of chair = 2.3 cm, and width of chair = 2.3 cm
\begin {align} \text {Length of one chair on scale drawing}& = \text{2.3 cm}\\ \text {So, length of one chair in real life} & = \text{2.3 cm} \times 30\\ &= \text{69 cm} \end {align} \begin {align} \text {Width of one chair on scale drawing} & = \text{2.3 cm}\\ \text {So, width of one chair in real life}& = \text{2.3 cm} \times 30\\ &= \text{69 cm} \end {align}
The dimensions of the chair in real life are 69 cm 69 cm.
- Use the given scale to calculate the actual (real) size of the cupboard.
Expected measurements: length of cupboard = 7 cm, and width of cupboard = 3 cm
\begin {align} \text {Length of cupboard on scale drawing}& = \text{7 cm}\\ \text {So, length of cupboard in real life} & = \text{7 cm} \times 30\\ &= \text{210 cm} \end {align} \begin {align} \text {Width of cupboard on scale drawing} &= \text{3 cm}\\ \text {So, width of cupboard in real life} & = \text{3 cm} \times 30\\ & = \text{90 cm} \end {align}
The dimensions of the cupboard in real life are 210 cm 90 cm.
- Use the given scale to calculate the actual (real) size of the dimensions of the room in metres. (Remember: 1 metre = 100 centimetres)
Expected measurements: length of room = 15 cm, and width of room = 13 cm
\begin {align} \text {Length of room on scale drawing} &= \text{15 cm}\\ \text {So, length of room in real life} &= \text{15 cm} \times 30\\ & = \text{450 cm}\\ & = \text{4.5 m} \end {align} \begin {align} \text {Width of room on scale drawing} & = \text{13 cm}\\ \text {So, width of room in real life} & = \text{13 cm} \times 30\\ &= \text{390 cm}\\ & = \text{3.9 m} \end {align}
The dimensions of the dining room in real life are 4.5 m 3.9 m.
10.3 Practical applications
We often use scale drawings in real life. Maps are scale drawings. As we have mentioned, architectural and building plans are scale drawings.
Remember that a scale drawing is exactly the same shape as the real object, just drawn smaller (or sometimes bigger).
There are two types of calculations that we do when we draw scale diagrams:
- We convert real measurements to draw our own scale drawings. Worked example 10.2 shows you how to do this.
- We convert the measurements given on a scale drawings to real measurements. Worked example 10.3 shows you how to do this.
The final exercise of this chapter gives you the opportunity to apply your knowledge and practise your skills.
Worked example 10.4: Making a scale drawing
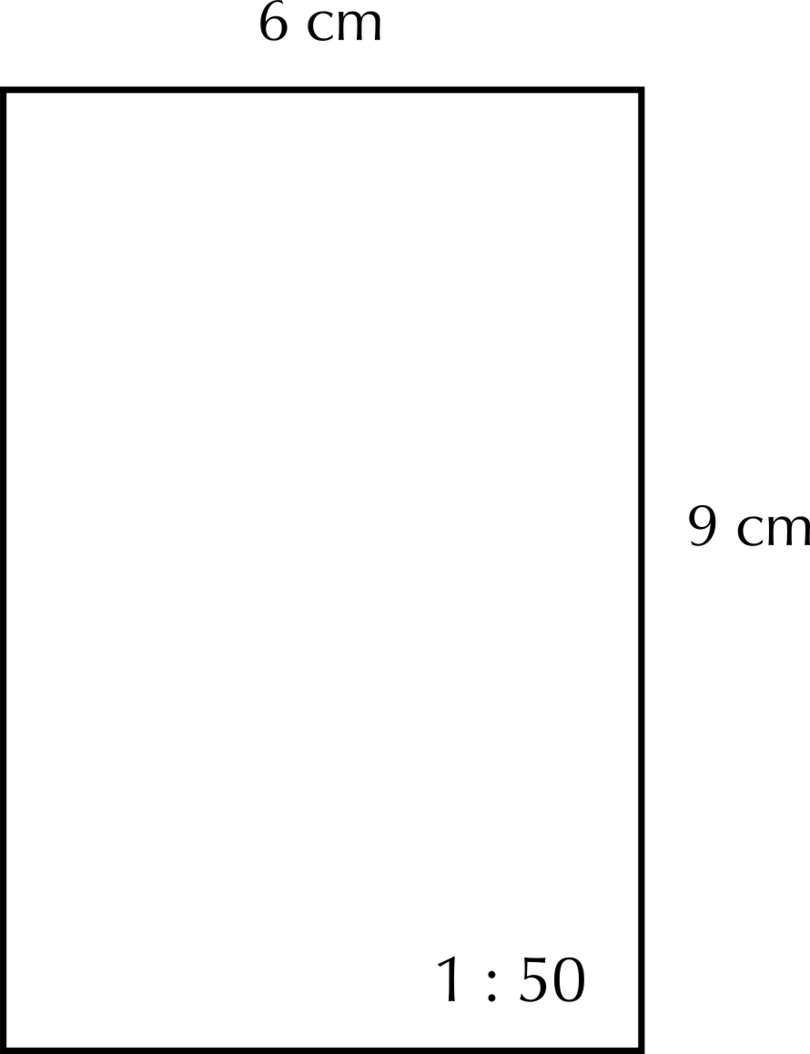
Draw a scale drawing of a room that has real dimensions of 300 cm by 450 cm. Use a scale of .
-
Step 1: Take note of the given scale and convert the width of the room.
\[ \begin {align} \text {Width of the room in real life} & = \text{300 cm}\\ \text {So, width of the room on scale drawing} & = \text{300 cm} \div 50\\ &= \text{6 cm} \end {align}\] -
Step 2: Take note of the given scale and convert the length of the room.
\[ \begin {align} \text {Length of the room in real life} & =\text{450 cm}\\ \text {So, length of the room on scale drawing} & = \text{450 cm} \div 50\\ &= \text{9 cm} \end {align}\] -
Step 3: Draw the scale drawing.
The scaled measurements are 6 cm by 9 cm. You can now draw the scale drawing.
It is possible that the solution shown above does not display correctly on your device. The accurate scale drawing should have the measurements as shown above.
-
Step 4: Remember to show the scale on the scale drawing.
The scale is .
Exercise 10.4: Apply your scale drawing skills
-
In this question you will add some furniture to the room shown in the diagram in Worked example 10.4.
The room has the same dimensions (300 cm 450 cm) and the scale to be used is still .
Draw the following two items using the dimensions provided. (You may place the furniture in the room in any way you choose.)
- a couch 200 cm 120 cm
- a table 150 cm long and 100 cm wide
The couch:
The scale of means that 1 unit on your drawing will represent 50 units in real life, so 1 cm on your drawing will represent 50 cm in real life.
\begin {align} \text {Length of the couch in real life} &= \text{200 cm}\\ \text {So, length of the couch on scale drawing} & = \text{200 cm} \div 50\\ &= \text{4 cm} \end {align} \begin {align} \text {Width of the couch in real life} & = \text{120 cm}\\ \text {So, width of the couch on scale drawing} & = \text{120 cm} \div 50\\ &= \text{2.4 cm} \end {align}The scaled dimensions of the couch are 4 cm 2.4 cm.
The table:
\begin {align} \text {Length of the table in real life} & = \text{150 cm}\\ \text {So, length of the table on scale drawing} & = \text{150 cm} \div 50\\ & = \text{3 cm} \end {align} \begin {align} \text {Width of the table in real life} & = \text{100 cm}\\ \text {So, width of the table on scale drawing} & = \text{100 cm} \div 50\\ &= \text{2 cm} \end {align}The scaled dimensions of the table are 3 cm 2 cm.

It is possible that the solution shown above does not display correctly on your device. The accurate scale drawing should have the measurements as shown above.
-
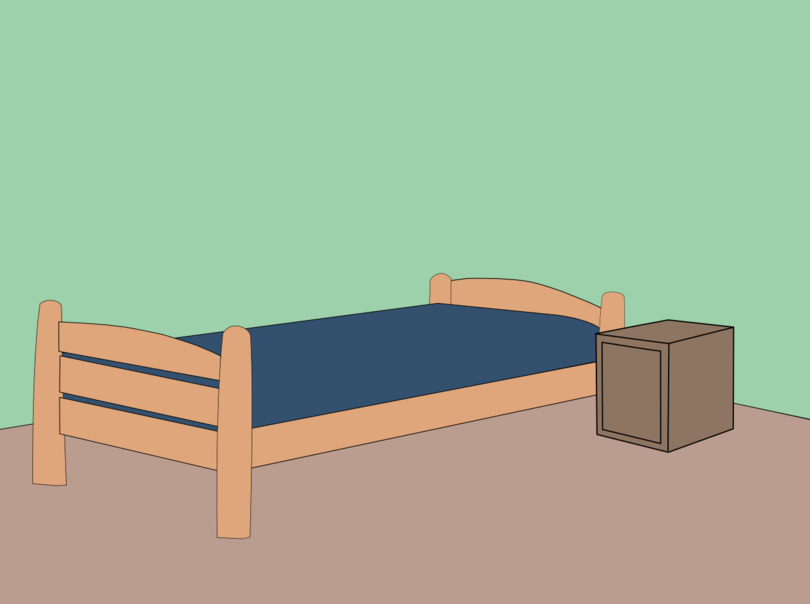
The bedroom shown in the picture below is 350 cm by 400 cm. It has a standard-sized single bed of 92 cm by 188 cm. The bedside table is 40 cm by 40 cm. Draw a scale drawing to show the layout of the room. Use the scale \(1:50\).
The bedroom:
\begin {align} \text {Real width of bedroom} & = \text{350 cm}\\ \text {So, width of bedroom on scale drawing} & = \text{350 cm} \div 50\\ &= \text{7 cm} \end {align} \begin {align} \text {Real length of bedroom} & = \text{400 cm}\\ \text {So, length of bedroom on scale drawing} & = \text{400 cm} \div 50\\ &= \text{8 cm} \end {align}The bed:
\begin {align} \text {Real width of bed} & = \text{92 cm}\\ \text {So, width of bed on scale drawing} & = \text{92 cm} \div 50\\ & = \text{1.84 cm} \end {align} \begin {align} \text {Real length of bed} & = \text{188 cm}\\ \text {So, length of bed on scale drawing} & = \text{188 cm} \div 50\\ & = \text{3.76 cm} \end {align}Bedside table:
\begin {align} \text {Real side length of bedside table} & = \text{40 cm}\\ \text {So, side length of the bedside table on scale drawing} & = \text{40 cm} \div 50\\ & = \text{0.8 cm} \end {align}Scale drawing:

It is possible that the solution given above does not display correctly on your device. The accurate scale drawing should have the measurements as shown above.
-
You are given the following information about the actual dimensions of an office and the furniture in it:
- Room: 360 cm wide and 420 cm long
- Window: 120 cm wide
- Door: 120 cm wide
- Desk: 120 cm wide and 180 cm long
- Chair: 60 cm wide and 60 cm long
- Bookshelf: 150 cm long
Using a scale of , calculate the scaled dimensions of the room and the furniture. Then draw a scale diagram of the room. Arrange the furniture in any sensible manner.
Room:
\begin {align} \text {Length of room in real life} & = \text{420 cm}\\ \text {So, length of the room on scale drawing} & = \text{420 cm} \div 60\\ & = \text{7 cm} \end {align} \begin {align} \text {Width of room in real life} & = \text{360 cm}\\ \text {So, width of the room on scale drawing} & = \text{360 cm} \div 60\\ & = \text{6 cm} \end {align}Window:
\begin {align} \text {Width of window in real life} & = \text{120 cm}\\ \text {So, width of window on scale drawing} & = \text{120 cm} \div 60\\ & = \text{2 cm} \end {align}Door:
\begin {align} \text {Width of door in real life} & = \text{120 cm}\\ \text {So, width of the door on scale drawing} & = \text{120 cm} \div 60\\ & = \text{2 cm} \end {align}Desk:
\begin {align} \text {Length of desk in real life} & = \text{180 cm}\\ \text {So, length of desk on scale drawing} & = \text{180 cm} \div 60\\ & = \text{3 cm} \end {align} \begin {align} \text {Width of desk in real life} &= \text{120 cm}\\ \text {So, the width of desk on scale drawing} & = \text{120 cm} \div 60\\ &= \text{2 cm} \end {align}Chair:
\begin {align} \text {Length of one side of chair in real life} & = \text{60 cm}\\ \text {So, length of one side of chair on scale drawing} & = \text{60 cm} \div 60\\ & = \text{1 cm} \end {align}Bookshelf:
\begin {align} \text {Length of bookshelf in real life} & = \text{150 cm}\\ \text {So, length of bookshelf on scale drawing} & = \text{150 cm} \div 60\\ & = \text{2.5 cm} \end {align}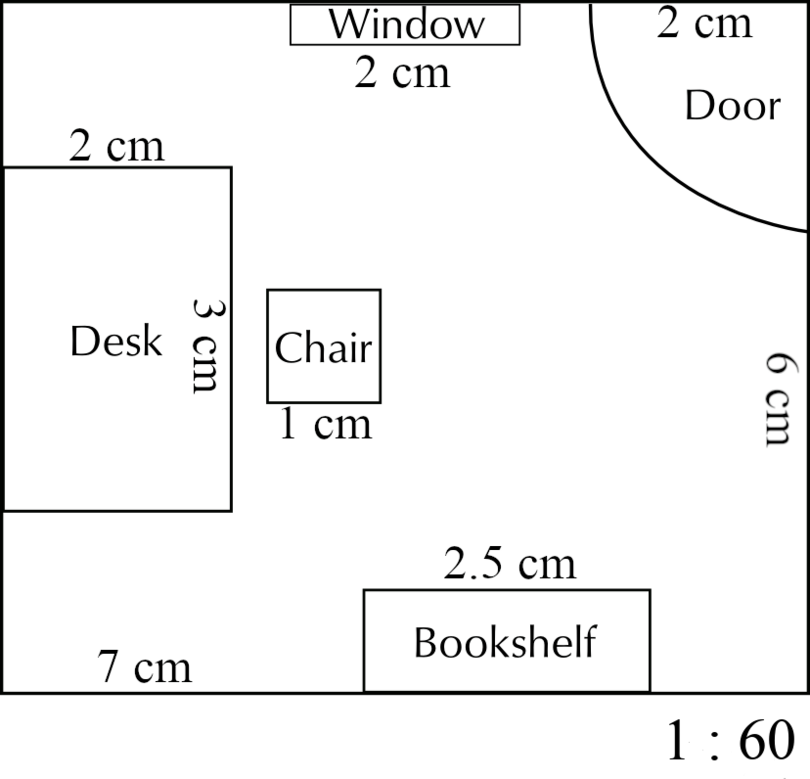
It is possible that the solution given above does not display correctly on your device. The accurate scale drawing should have the measurements as shown above.
10.4 Summary
- A closed, two-dimensional or flat figure is called a plane shape. A plane shape has length and breadth, but no thickness.
- Quadrilaterals are examples of plane shapes.
- Properties of a parallelogram:
- A parallelogram is a quadrilateral with both pairs of opposite sides parallel and equal.
- A parallelogram has two pairs of equal opposite angles.
- The diagonals of a parallelogram bisect each other.
- Properties of a rhombus:
- A rhombus is a quadrilateral with four equal sides. The two pairs of opposite sides are parallel to each other.
- A rhombus has two pairs of equal opposite angles.
- The diagonals of a rhombus bisect each other at right angles (perpendicularly).
- Properties of a kite:
- A kite is a quadrilateral with two equal short adjacent sides and two equal long adjacent sides.
- One pair of opposite angles of a kite are equal.
- One diagonal of a kite bisects the other diagonal at right angles (perpendicularly).
- A scale drawing is a diagram on which a real object (for example, a book or a table) is made bigger or smaller while keeping the same proportions.
- To draw a scale drawing you need two pieces of information:
- You need to know the actual measurements of everything that has to go onto the scale drawing.
- You need to know what scale you have to use.
- The scale shows the ratio that was used to enlarge or reduce the object. The scale is written as a ratio.
- There are two types of calculations that we do when we draw scale diagrams:
- We convert real measurements to draw a scale drawings.
- We convert the measurements given on a scale drawing to real measurements.