Chapter 8: Constructions
The ancient Greek mathematicians were the first people to do constructions in Mathematics. A construction in Mathematics is an accurate drawing of angles and lines. You are only allowed to use a straightedge and a pair of compasses with a pencil in it when you do a construction.
-
A straightedge
A straightedge is an instrument with a straight edge, so we use it to draw straight lines. It is a ruler without any markings on it, because when you do constructions you are not allowed to take any measurements.

Most of the time you will use your ruler when you do constructions and have to draw straight lines. The important thing to remember is that although there are markings on the ruler, you should not use them to do your constructions. You may only use the ruler to draw a straight line. You may use it to check your constructions once you have finished them.
-
A pair of compasses (or a compass) is an instrument to draw circles.
It has two legs:
- One leg has a sharp point so that you can put it firmly into position on a page. When you draw a circle the sharp point will stay on the dot where you positioned it. The sharp point will not move.
- The other leg has space to insert a pencil. You move the leg with the pencil to and draw the circle on the page.
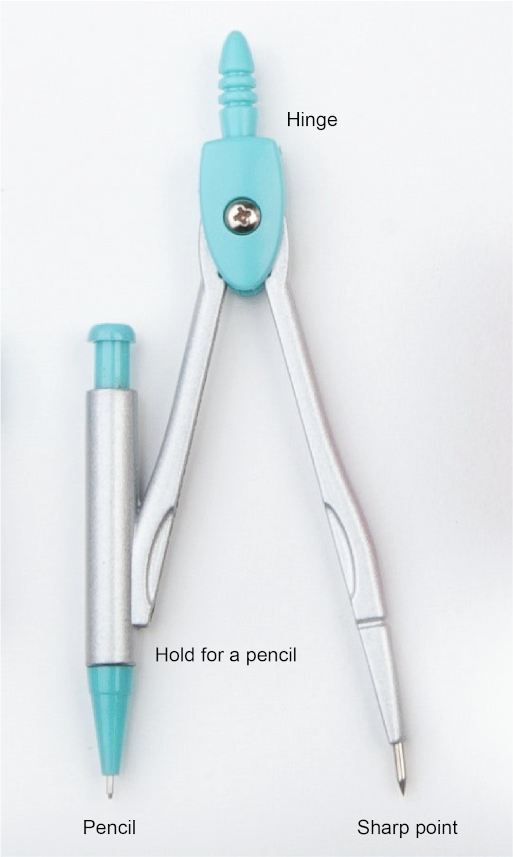
The two legs of the compass are joined at the hinge. Make sure that the metal screw at the hinge is fitted tightly so that the two legs of the compass will not open too easily. Also make sure that your pencil is sharpened. A blunt pencil will lead to diagrams that are not accurate.
8.1 Construction of angles
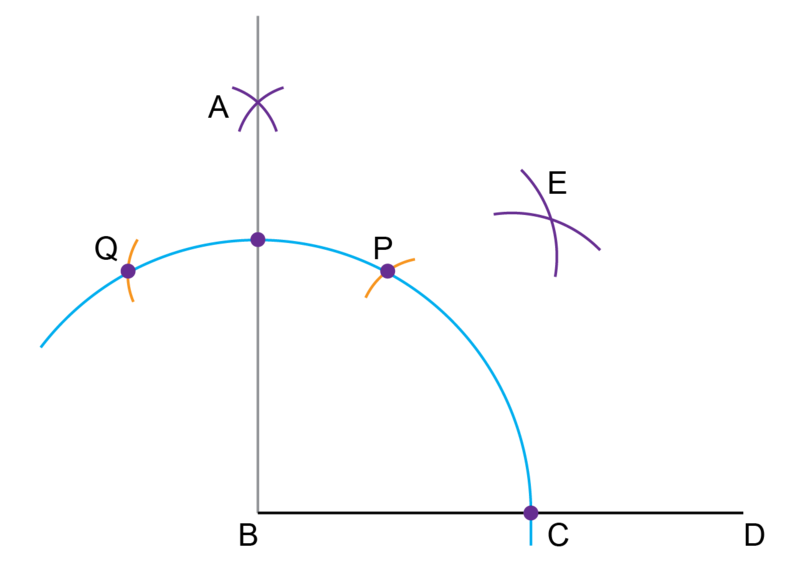
Here is a fun activity for you to do: use your compass to draw a circle. Keep the the position of the legs of the compass exactly the same throughout the activity. Make a dot anywhere on the circumference of the circle.

Put the compass on the dot and start to make little arcs on the circumference of the circle, each one made from the one before, as shown in the diagram.

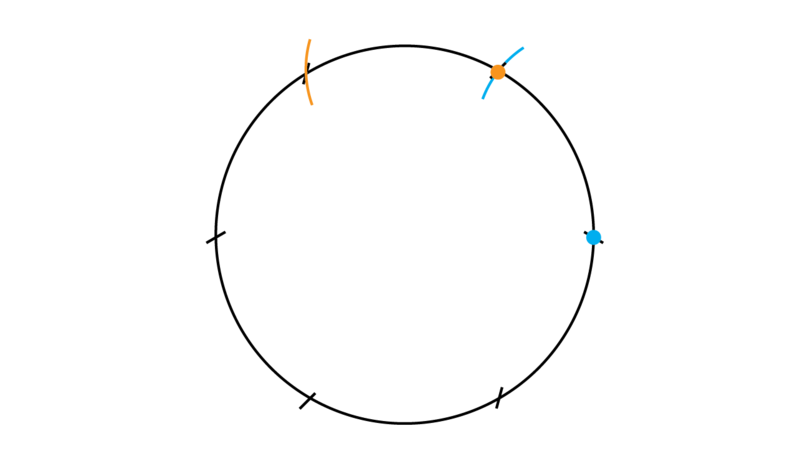
You will find that you can fit in exactly six of these little arcs:

You know that a full turn (or revolution) is equal to , so if we join the centre of the circle to each one of the six small arcs on the circumference, we form six angles of each.

If you are asked to construct an angle of , you simply do a part of the activity that you have done above.
Construct an angle of 30 degrees
If you are asked to construct an angle of , you construct an angle of and then bisect it.
In a previous year, you learned how to construct an angle of 60 degrees, and how to bisect an angle. You will use these two skills to construct an angle of 30 degrees.
Worked example 8.1: Constructing an angle of 30 degrees
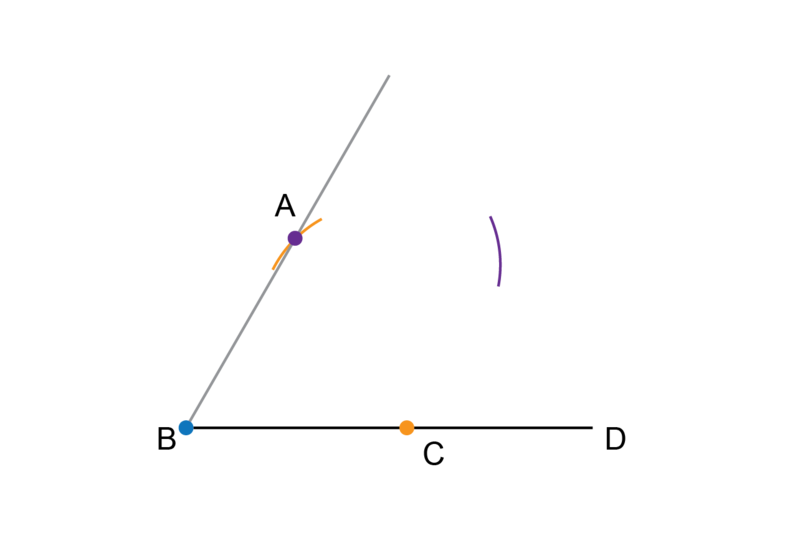
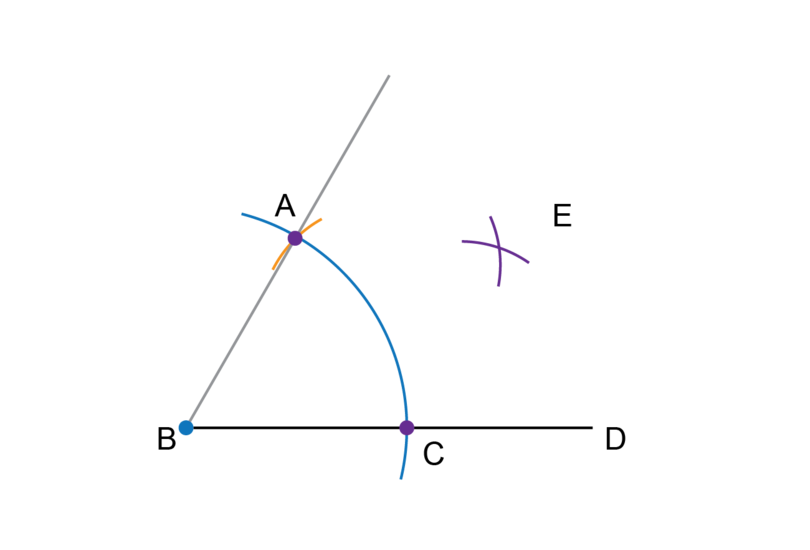
You are given a line segment as shown below. Construct so that is a point on and = .

-
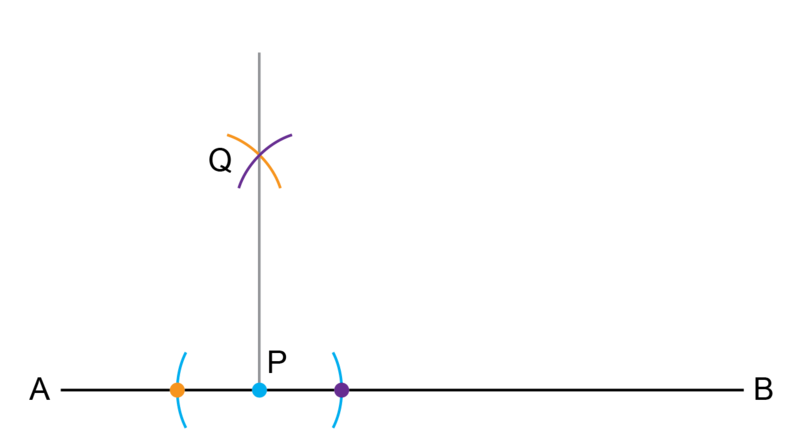
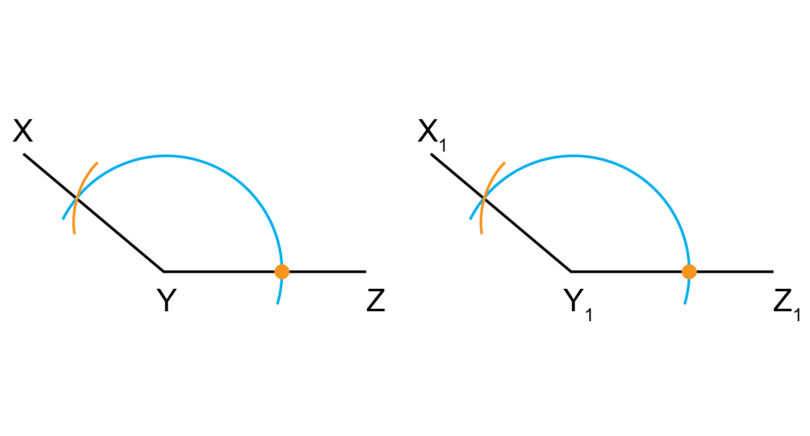
Step 1: Draw a large arc.
Firstly, construct an angle of (Step 1 to Step 3).
Copy the given line segment into your workbook and make a dot at point .
Put the point of the compass at (on the blue dot) and draw a large arc as shown. Label point where the arc intersects the line segment. Keep the compass legs open in exactly the same position for the next step.

-
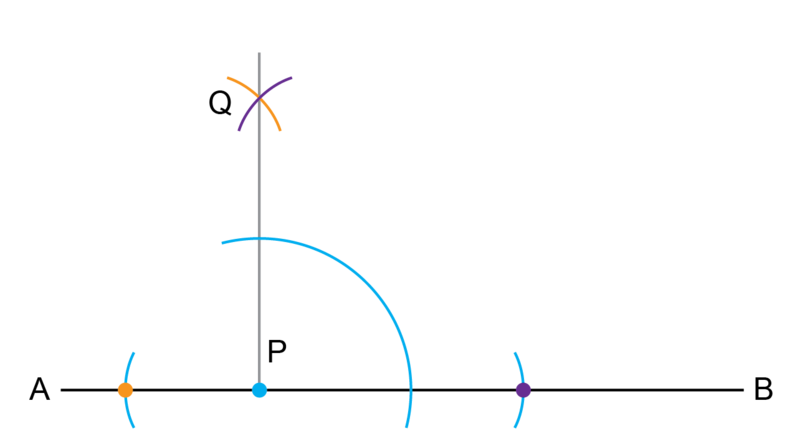
Step 2: Draw a second, small arc.
Put the point of the compass onto (on the orange dot) and draw a small arc to intersect with the first large arc.
Label the point of intersection as point .

-
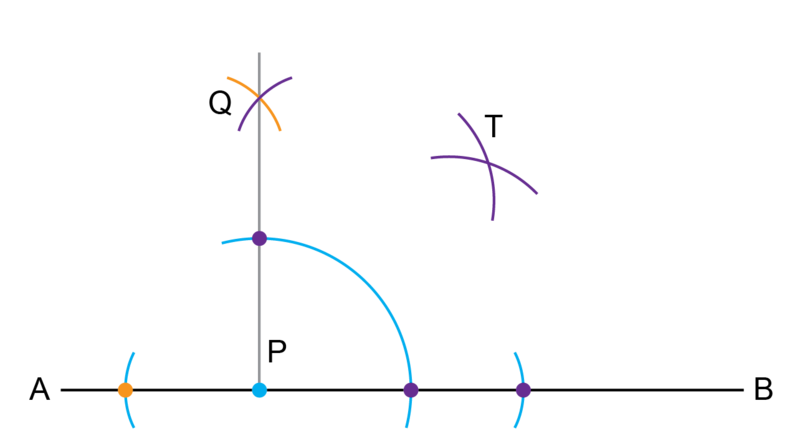
Step 3: Complete the angle of .
Use a ruler and draw a line segment from point and through point .

-
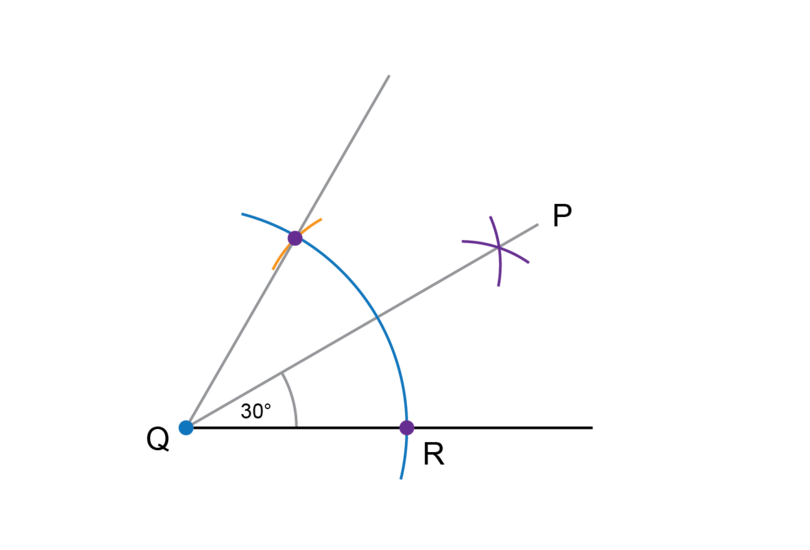
Step 4: Draw the first arc to bisect the angle of .
Put the compass on point and draw an arc as shown.
-
Step 5: Draw the second arc to bisect the angle of .
Keep the compass open at exactly the same width as for Step 4. Put the compass on point and draw an arc as shown.
Label the point of intersection as .
-
Step 6: Complete the construction.
Draw a line segment from point through point .

-
Step 7: Check your work.
Use a protractor to measure . The angle should be equal to .
It is a good idea to rotate your workbook If you have to do a construction involving a line that is not horizontal on the page in front of you. Never erase the construction lines after you have completed a construction.
Exercise 8.1: Construct an angle of 30 degrees
-
Construct an angle of . Label the angle as .
Follow the first three steps of Worked example 8.1 to construct an angle of .
-
Bisect of question 1 so that = .
Continue with the construction from question 1. Follow steps 4, 5, 6 and 7 from Worked example 8.1 to construct an angle of .
-
Construct an angle of . Label the angle as .
Follow all the steps in Worked example 8.1 to construct an angle of .
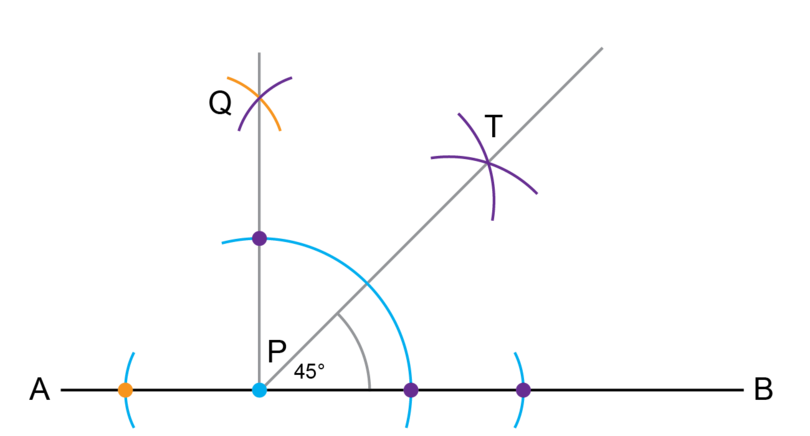
Construct an angle of 45 degrees
If you are asked to construct an angle of , you construct an angle of and then bisect it.
To construct an angle of 90 degrees, you will use of the fun activity we did earlier, where you made six small arcs on the circumference of a circle.
In this construction, you will make only two arcs: you will make the first arc to form an angle of and the second arc to form an angle of .
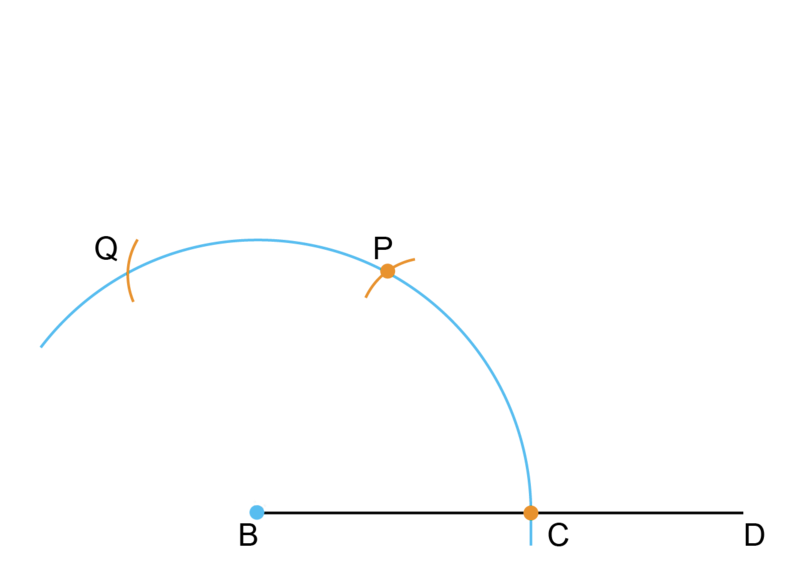
An angle of is exactly halfway between and , so you will construct the one arm of the right angle exactly halfway between the arcs for and .
You have learned how to construct an angle of 90 degrees, and to bisect an angle. You will use these skills to construct an angle of 45 degrees.
There is more than one way to do this construction, and two different methods are shown below.
Worked example 8.2: Constructing an angle of 45 degrees (Method 1)
Construct an angle of 45 degrees.
Method: Construct an angle of 90 degrees and bisect the angle.
-
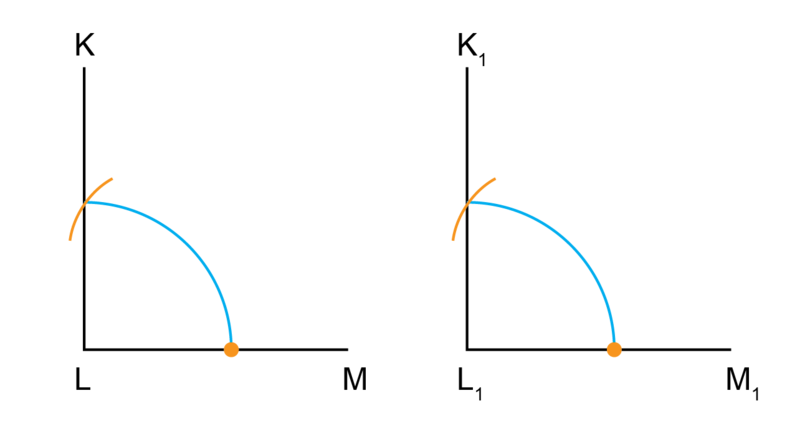
Step 1: Construct a line segment, make a dot at point and draw the first large arc.
Start by constructing an angle of (Step 1 to Step 6).
Put the compass at point (on the blue dot) and draw a large arc. Label point where the arc intersects the line segment. Keep the compass legs in exactly the same position for the next two steps.
-
Step 2: Draw the first small arc.
Put the compass on point and make an arc on the large arc that was drawn in Step 1.
Label this as point . (Point shows the mark for an angle of .)
-
Step 3: Draw the second small arc.
The compass should still be open at exactly the same width as for the first large arc.
Put the compass on point and make another arc on the large arc that was drawn in Step 2.
Label this as point . (Point shows the mark for an angle of .)
-
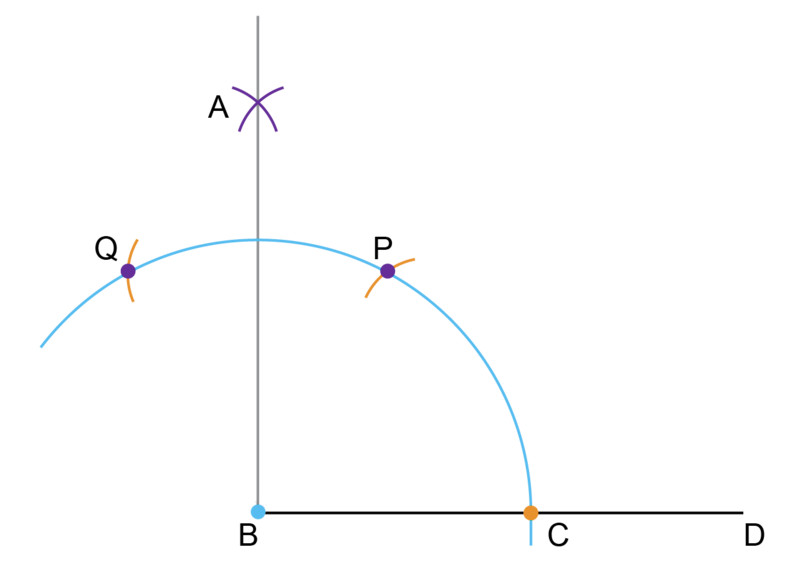
Step 4: Draw the first arc to construct the right angle.
We want to find the line for an angle of . We know that this line should be exactly halfway between the arcs for the angles of and .
The compass should stay in the same position for these two arcs (Step 4 and Step 5).
Put the compass on point and make an arc outside of the large arc, as shown below.
-
Step 5: Draw the second arc to construct the right angle.
Keep the compass fixed at the same width as for Step 4.
Put the compass on point and make another arc outside of the large arc to intersect the arc already drawn there. Label the point of intersection of the two arcs as .

-
Step 6: Complete the angle of .
Use a ruler to draw a line segment from point through point .
-
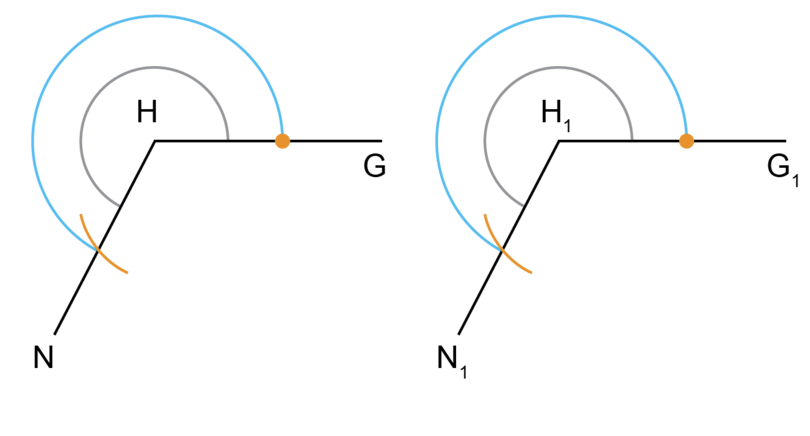
Step 7: To bisect the angle of , draw a new arc.
Put the point of the compass where the big arc (from Step 1) crosses and draw an arc outside of the large arc, and towards , as shown.
-
Step 8: Draw the second arc to bisect the angle of .
Keep the compass open the same width as for Step 7.
Put the compass on point and draw an arc as shown.
Label the point of intersection as point .
-
Step 9: Complete the construction.
Draw a line segment from point through point .

-
Step 10: Check your work.
Use a protractor to measure . The angle should be equal to .
Worked example 8.3: Constructing an angle of 45 degrees (Method 2)
Construct an angle of 45 degrees. You are given line with a point on the line.
Method: Construct a perpendicular line from a point on a line segment and then bisect the right angle.
-
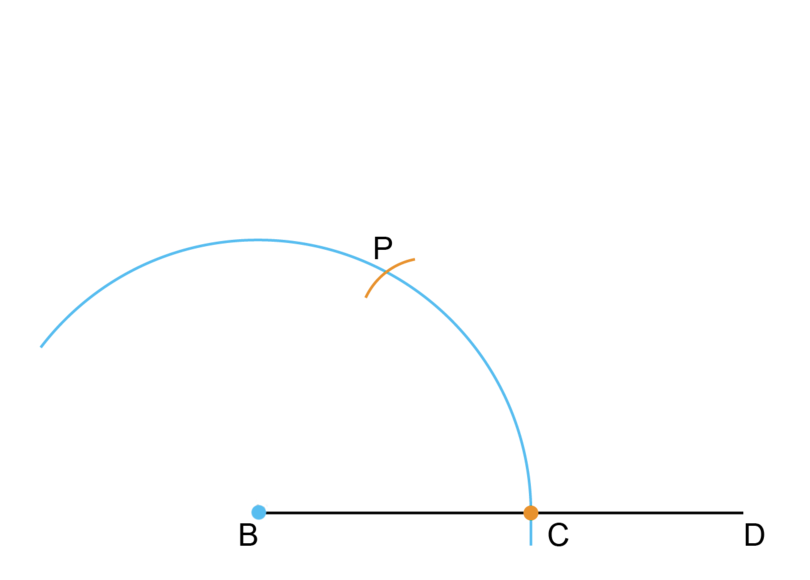
Step 1: On line , make arcs equal distances from on both sides.
Put the compass on point (where the blue dot is shown).
Draw an arc to the left of point . Keep the compass open at the same width, and draw another arc to the right of point . These arcs should intersect with line .

-
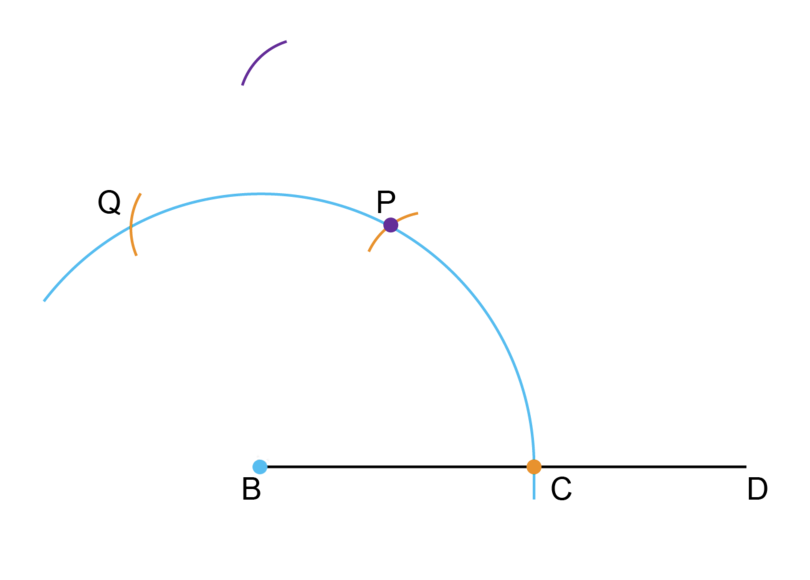
Step 2: Draw an arc from the left.
You can change the position of the compass legs, to open them wider. Put the compass on the left arc from Step 1 (where the orange dot is shown).
Draw an arc so that it is above point .

-
Step 3: Draw an arc from the right.
Keep the compass open at the same width as for Step 2. Put the compass on the right arc from Step 1 (where the purple dot is shown).
Draw an arc so that it crosses the arc from Step 2.

-
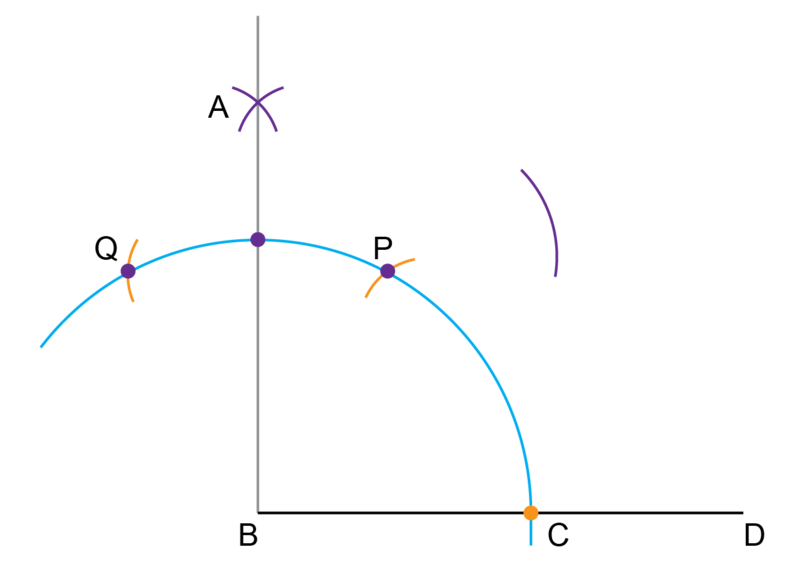
Step 4: Draw the perpendicular line.
Point is where the two arcs from Step 2 and Step 3 intersect.
Use a ruler and draw a line from point and through point . This gives you your right angle.
-
Step 5: Draw the first big arc to bisect the right angle.
Put the compass on point . Keep the compass fixed at that width and draw a big arc that intersects and .
-
Step 6: Draw the smaller arcs to bisect the right angle
Keep the compass at the same width for the next two arcs. From the intersection of the big arc from Step 5 with the line segments, draw two arcs that intersect each other. Label the point of intersection as point .
-
Step 7: Complete the construction.
Draw a line segment from point through point .
-
Step 8: Check your construction.
Use a protractor and measure and .
If each of them is equal to you have made an accurate construction.
For the exercise below, remember not to erase the construction lines after you have completed a construction.
Exercise 8.2: Construct an angle of 45 degrees
-
Use the method shown in Worked example 8.2 to construct an angle of .
Label the angle as .Follow Step 1 to Step 6 in Worked example 8.2 to construct a right angle.
-
Use your construction for question 1. Use the method shown in Worked example 8.2 to construct an angle of . Label the angle as .
Follow Step 7 to Step 10 in Worked example 8.2 to do the construction.
-
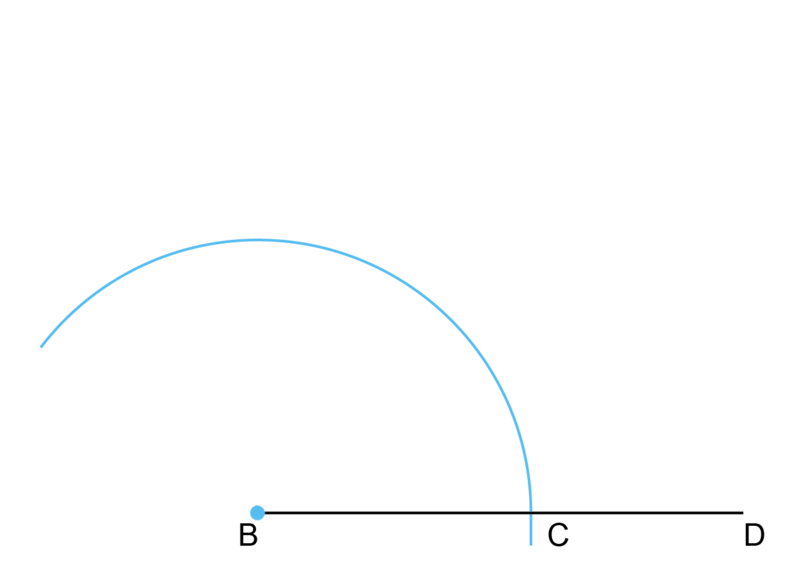
Draw a line segment and mark point on the line segment.
Construct a line from point that is perpendicular to .Follow Step 1 to Step 4 in Worked example 8.3 to do the construction.
-
Use your construction for question 3. Use the method shown in Worked example 8.3 to construct an angle of . Label the angle as .
Follow Step 5 to Step 8 in Worked example 8.3 to do the construction.
-
Construct an angle of . Use the method that you prefer.
Construction according to Worked example 8.2:
Construction according to Worked example 8.3:
-
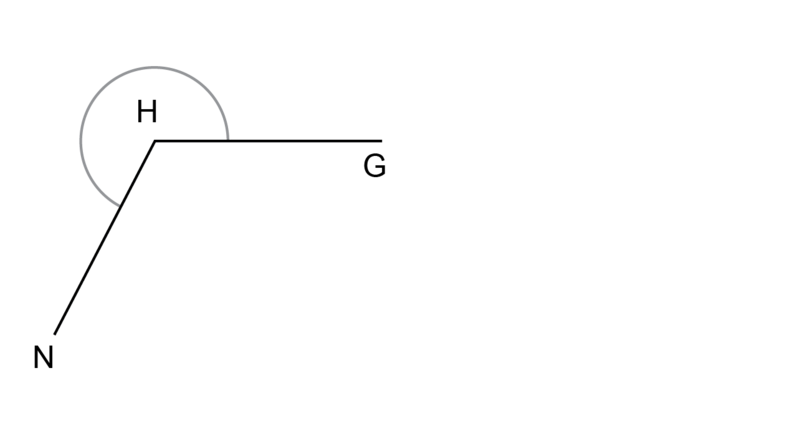
Amaka has to construct two angles of each. She says she will construct an isosceles right-angled triangle, then there will be two angles of each.
Is Amaka correct?Yes, Amaka is correct.
The three angles of a triangle add up to .
In a right-angled triangle one of the angles is equal to .
An isosceles triangle has two equal sides and the angles opposite the equal sides are also equal.
An isosceles right-angled triangle has one angle of and two angles of each.
Copy a given angle
The size of an angle does not depend on the length of the arms. In the diagram, below both angles are the same size.

The size of an angle depends on how far the one arm of the angle has turned (or rotated) away from the other arm of the angle. We use this fact when we want to construct an exact copy of a given angle.
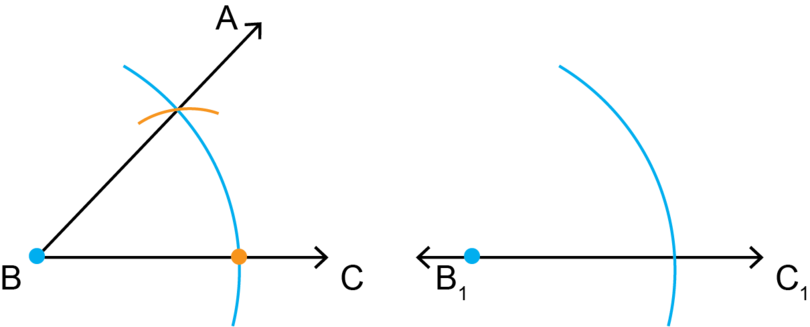
Worked example 8.4: Copying a given angle
is an acute angle.
Use a compass and ruler to construct a copy of . Label the new angle as .
-
Step 1: Construct the first arm of the angle by drawing a horizontal line. Use the labels and .
In each of the steps below, the first diagram is the given diagram, and the second diagram is the new construction. This worked example assumes that you have the original angle on paper, and can draw on it.

-
Step 2: Draw an arc on the given angle and on the new angle.
On the given diagram, put the compass on point and draw a large arc, as shown.
Keep the compass open at exactly the same width. On your copy of the diagram, put the compass on point and draw a copy of the first arc.

-
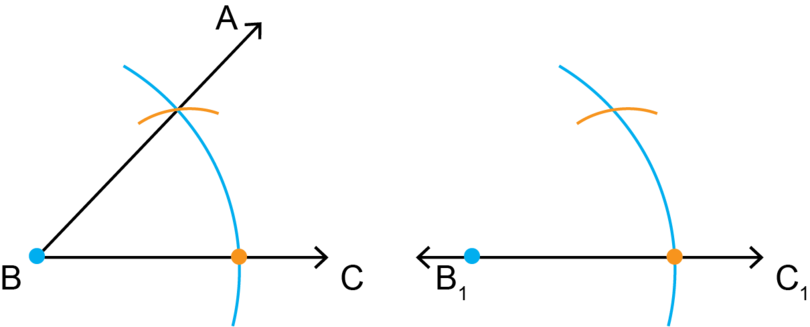
Step 3: Measure the distance between the two arms of the given angle.
On the given diagram, use your compass to measure the distance between the two points where the arc (of Step 2) intersects with and .
You do not draw line segment between the two points, you only measure the distance between them by opening your compass to the correct width.
-
Step 4: Mark the same distance on the new angle.
Keep the compass open at the same width as in Step 3. Put the compass on the point where the arc intersects with and draw a small arc that intersects the large arc.
-
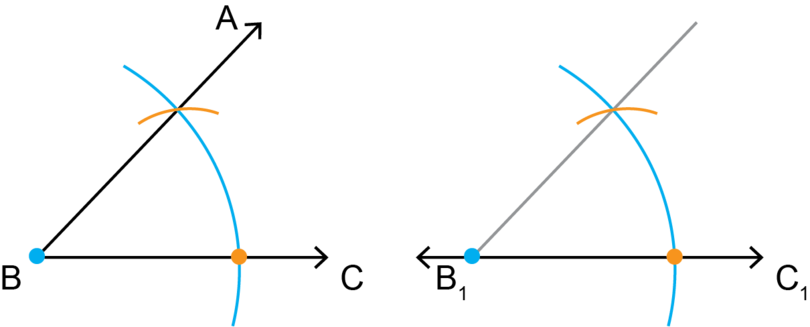
Step 5: Complete the construction.
Draw a line segment from point through the point where the two arcs intersect.
Mark that line .
-
Step 6: Remember to check your work.
Use a protractor to measure and .
The two angles should have the same size.
Exercise 8.3: Copy a given angle
Construct copies of the angles provided below, and use a protractor to check that your constructed angles are the correct size.
-
is an acute angle.

Use a compass and ruler to construct a copy of . Label the new angle as .
Follow the steps in Worked example 8.4 to do the construction.
-
is an obtuse angle.

Use a compass and ruler to construct a copy of . Label the new angle as .
Follow the steps in Worked example 8.4 to do the construction.
-
is a right angle.

Use a compass and ruler to construct a copy of . Label the new angle as .
Follow the steps in Worked example 8.4 to do the construction.
-
is a reflex angle.
Use a compass and ruler to construct a copy of . Label the new angle as .
Follow the steps in Worked example 8.4 to do the construction.
8.2 Constructions of plane shapes
A closed, two-dimensional or flat figure is called a plane shape. A plane shape has length and breadth, but no thickness.
In this section you will construct simple plane shapes, for example, parallelograms and triangles.
You may use a compass, ruler and also a protractor to do the constructions.
plane shape A plane shape is a flat figure with closed sides. It has length and breadth, but no thickness.
Worked example 8.5: Constructing a parallelogram
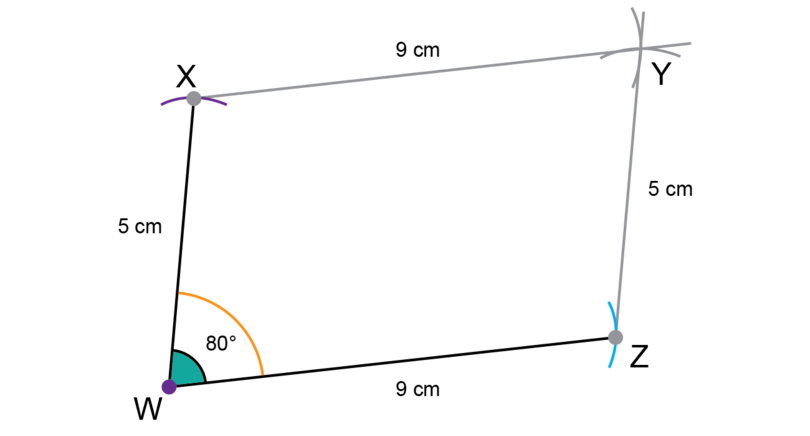
Make an accurate construction of parallelogram . = 5 cm, = and = 9 cm.
You may use a protractor.
-
Step 1: Make a rough sketch of the given information.
You know that the opposite sides of a parallelogram are equal, so = 5 cm and = 9 cm.

-
Step 2: Plan the order in which you will do the construction.
It is a good idea to start with , then construct , and then .
Point will be the point of intersection between an arc of 9 cm from point and an arc of 5 cm from point .
-
Step 3: Construct .
Draw a line segment (longer than 9 cm) and mark point .
Use a compass to measure a length of 9 cm on your ruler.
Keep the compass open at that width. Put the compass on point and draw an arc to find point .

-
Step 4: Construct .
Use a protractor to measure and mark an angle of at point , then use a ruler to draw in the line.

-
Step 5: Construct .
Use a compass to measure a length of 5 cm on your ruler.
Keep the compass fixed at that width, put the compass point on , and draw an arc to find point .

-
Step 6: Construct .
Use a compass to measure a length of 9 cm on your ruler.
Keep the compass open at that width. Put the compass on point and draw an arc in the position shown below.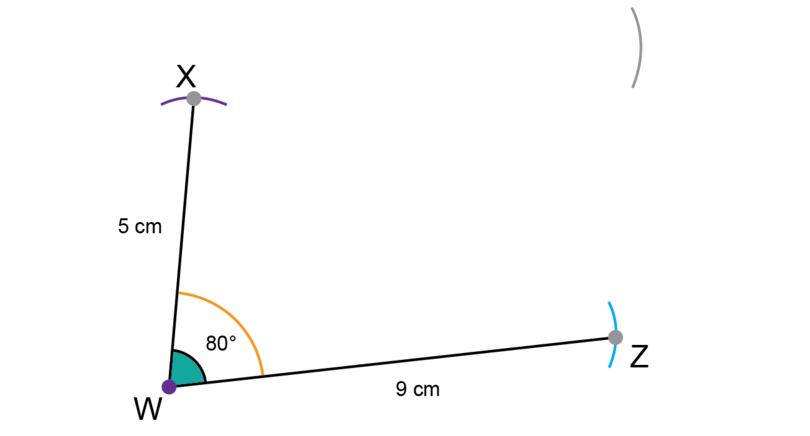
-
Step 7: Construct .
Use a compass to measure a length of 5 cm on your ruler.
Keep the compass fixed at that width. Put the compass on point and draw an arc to intersect the previous arc.
Label the point of intersection between the two arcs (Step 6 and Step 7) as point .
-
Step 8: Complete the construction.
Use a ruler to draw line segments and , which meet at the point at which the two arcs intersect.
-
Step 9: Remember to check your work.
Use a ruler to check that = = 9 cm and = = 5 cm.
Use a protractor to check that = .
For the exercise below, remember not to erase the construction lines after you have completed a construction.
Exercise 8.4: Construct simple plane shapes
-
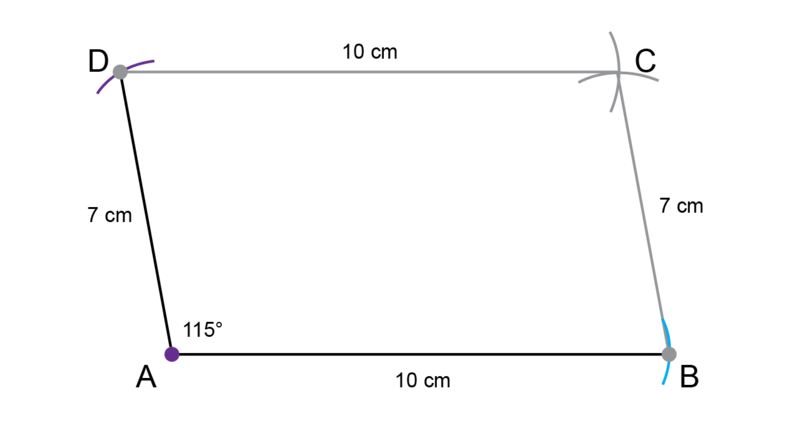
Construct parallelogram .
= 7 cm, = and = 10 cm.Follow the steps in Worked example 8.5 to do the construction.
-
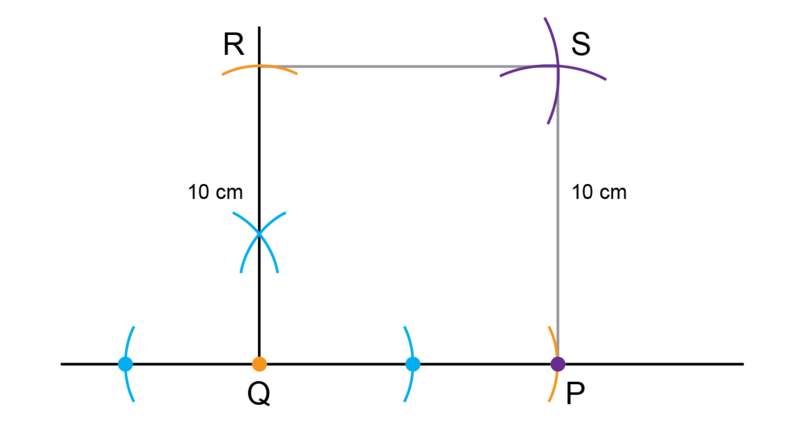
Construct square . The length of is 10 cm.
You know that a square has four right angles and that all four sides of a square are equal.
Make a rough sketch first and then do the construction accurately.Order of construction:
- Draw line segment and mark point .
- Use a compass and construct a line segment perpendicular to the first line segment at point .
- Measure a distance of 10 cm with a compass on a ruler. Place the compass on point and draw arcs to find point and point .
- Keep the compass open at 10 cm for the next two arcs also:
- Put the compass on point and draw an arc.
- Put the compass on point and draw an arc.
- Label the point of intersection between the two arcs as point .
- Draw line segment and to complete the construction.
-
Construct as shown below. Do not use a protractor in this construction. Only use a compass, ruler and pencil.
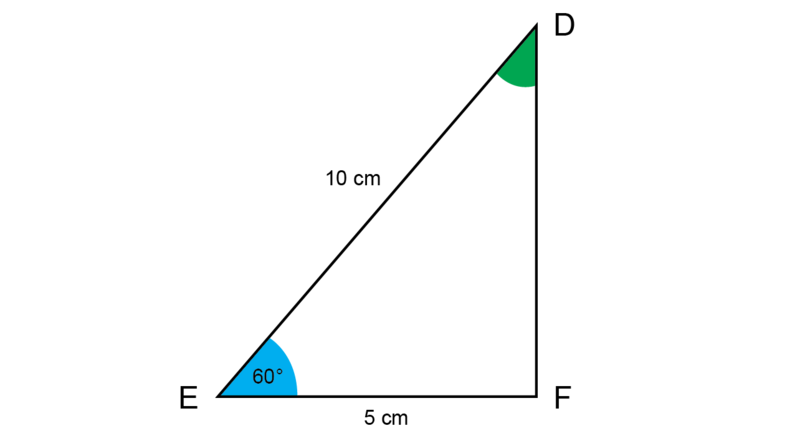
Measure the size of and .
- Draw a line segment and label point .
- Measure a length of 5 cm with a compass on a ruler. Keeping the compass fixed at that width, place the compass on point and draw an arc to find point .
- Use a compass to construct an angle of at point : first draw a big arc and then (with the compass in the same position) draw another arc from the point where the first arc intersects with , as shown in orange.
- Draw a line segment from point through the point where the two arcs of the previous step intersect.
- Measure a length of 10 cm with a compass on a ruler. Keep the compass fixed at that width, place the compass on point and draw an arc to find point .
- Draw a line segment from point to point .
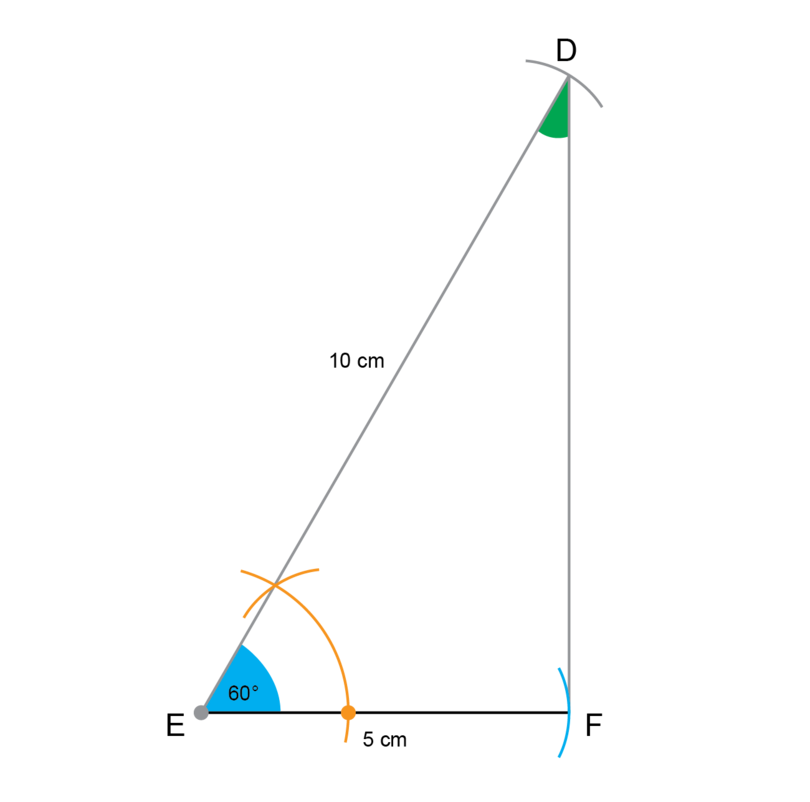
= and = .
-
Construct as shown below. Do not use a protractor in this construction. Only use a compass, ruler and pencil.

Measure the size of and .
- Draw a long line segment and label point .
- Measure a length of 6 cm with a compass on a ruler. Keep the compass open at that width, place the compass on point and draw an arc to find point .
- Construct a perpendicular line segment at point .
- Bisect the right angle at point to construct an angle of .
- Measure a length of 6 cm with a compass on a ruler. Keeping the compass fixed at that width, place the compass on point and draw an arc to find point .
- Draw a line segment from point to point .
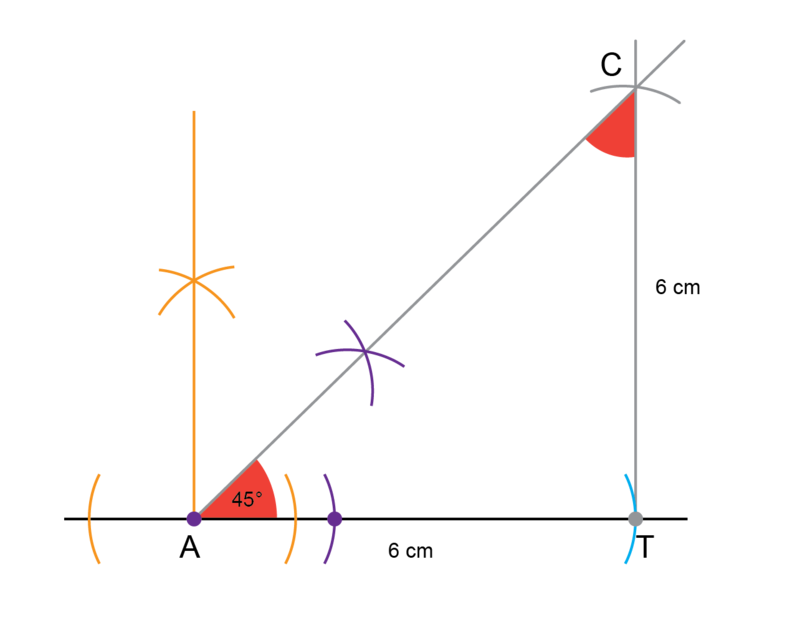
= and = .
8.3 Summary
- A construction in Mathematics is an accurate drawing of angles and lines.
- We use arcs in all the constructions. An arc is part of the circumference of a circle.
- There are methods for carrying out the following constructions, using only use a compass, ruler and pencil:
- an angle of 30 degrees
- an angle of 45 degrees
- copy a given angle
- simple plane shapes (for example, a parallelogram, square and triangle).
- To construct simple plane shapes, a protractor may be used if instructed.
- Never erase the construction lines after you have completed a construction.