Chapter 11: Constructions
A construction in Mathematics is an accurate drawing of angles and lines. For constructions in Mathematics, you are meant to use only a straightedge and a pair of compasses with a pencil. A straightedge is an instrument, usually made of metal, that has a very straight edge, so it can be used to draw straight lines. A straight edge usually does not have measurements marked on it.

In this chapter you are going to use the following instruments to make constructions: a compass with a pencil, a ruler and a protractor.
-
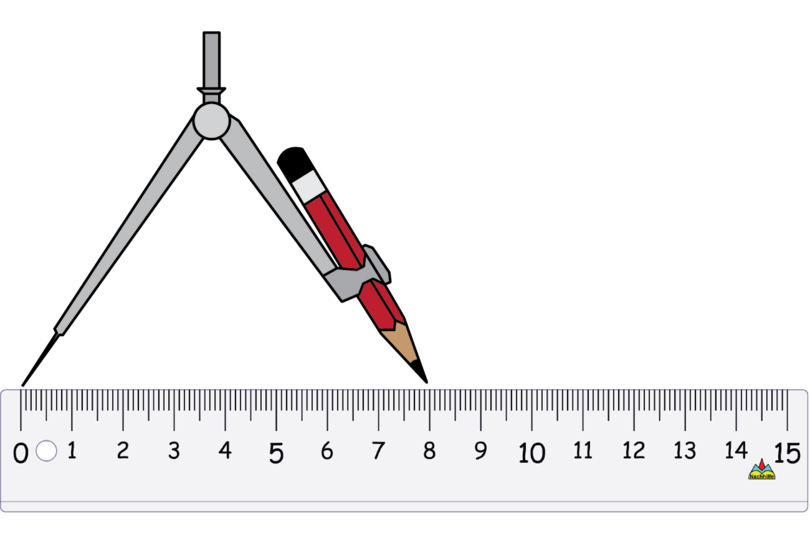
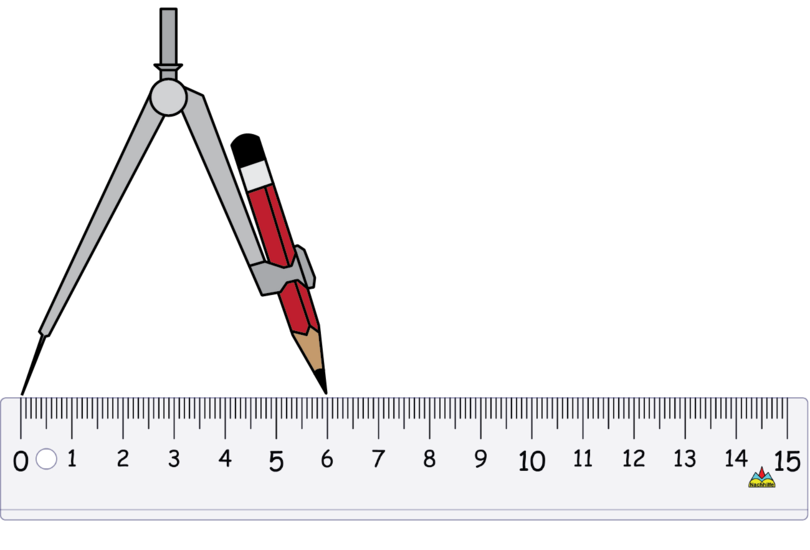
A pair of compasses (or a compass) is an instrument used for drawing circles and in constructions.
A compass has two legs:
- One leg has a sharp point so that you can put it firmly into position on a page. When you draw a circle, the sharp point will stay on the dot where you positioned it. The sharp point will not move.
- The other leg has place to insert a pencil. When you draw a circle, you move the leg that has the pencil in it to draw the circle on the page.
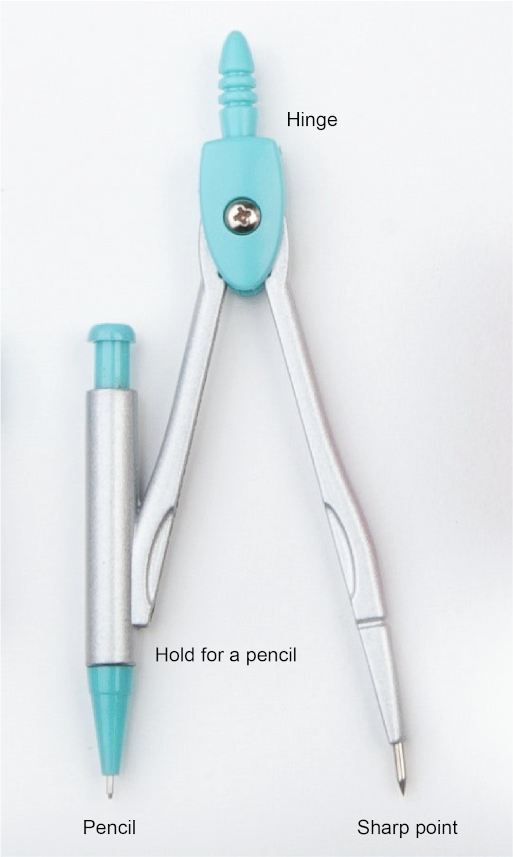
The two legs of the compass are joined at the hinge. Make sure that the screw at the hinge is tight, so that the two legs of the compass cannot move apart unless you want them to.
Also make sure that your pencil is sharpened. A blunt pencil will lead to diagrams that are not accurate.Do not confuse the compass that we use in mathematical constructions with the compass that we use to find direction.

-
A ruler
You will use a ruler when you do constructions and have to draw straight lines. Most of us do not have a straightedge, so we use a ruler instead.
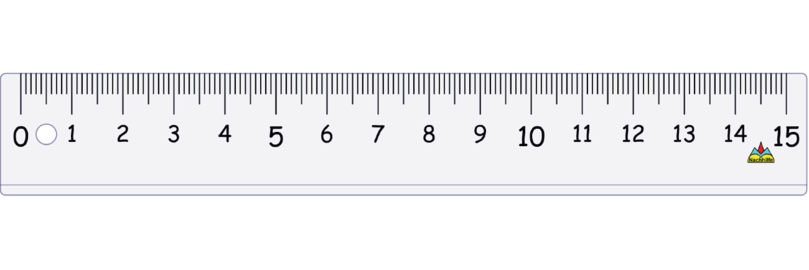
- In some constructions you will use the markings on the ruler to measure the length of a line segment. For example, when you have to construct a triangle, and you are given the lengths of one or two of the sides, you measure to make sure you are drawing lines of the correct length.
- In other constructions you will not use the markings on the ruler at all. For example, when you bisect a line segment or an angle, you use a construction method, and not measurements.
-
A protractor
We use a protractor to measure or draw an angle. We measure angles in degrees.
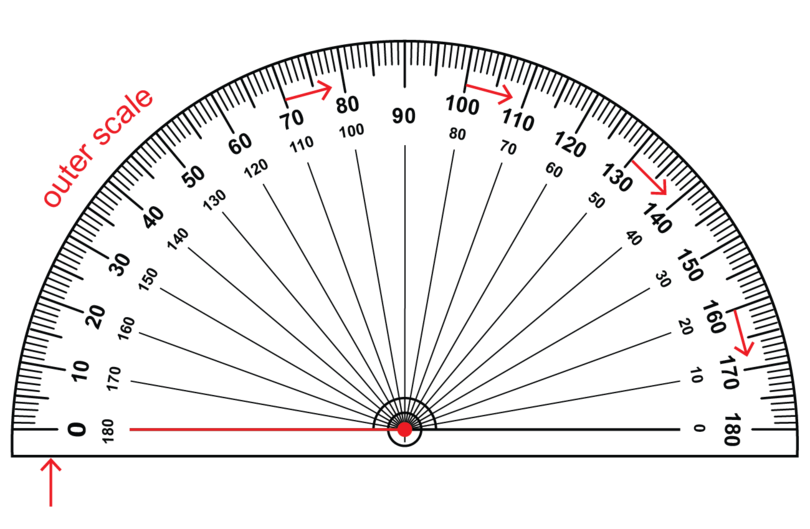
- Take note of the centre (or origin) of a protractor:
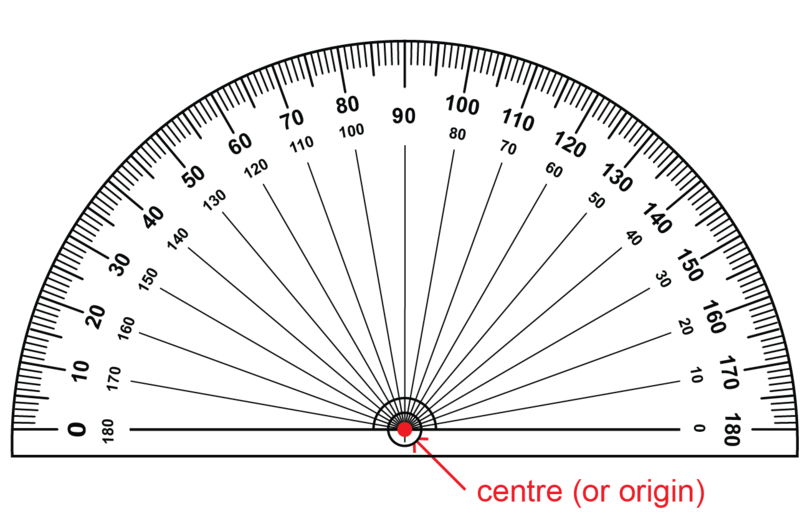
When you draw an angle you have to make sure that the centre (or origin) of the protractor is exactly on the vertex of the angle that you want to construct.
- The centre (or origin) of a protractor is on the base line of the protractor.
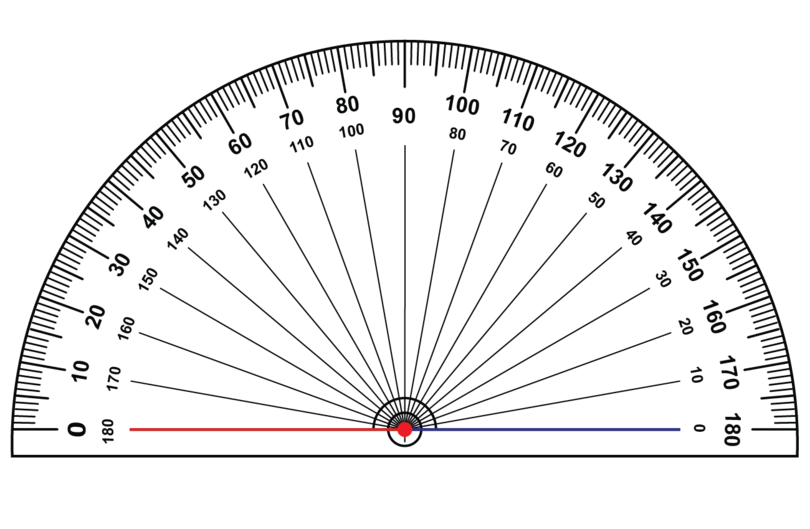
You also have to make sure that one side of an angle is exactly on the base line of the protractor before you construct the second arm of the angle.
-
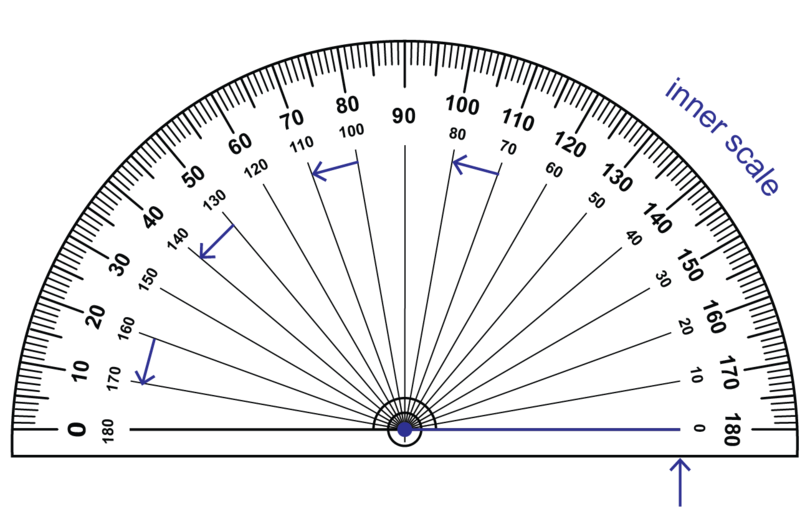
There are two zeros on a protractor:
If you begin measuring from the zero on the left hand side of the protractor, you use the outer scale on the protractor.
If you begin measuring from the zero on the right hand side of the protractor, you use the inner scale on the protractor.
It is a good idea to estimate the size of an angle before you measure or draw the angle. Then you can check against your estimate to see if your answer or construction is reasonable.
11.1 Construct triangles
You will learn how to construct different triangles.
It is helpful to remember the following important properties of triangles:
- The sum of the interior angles is .
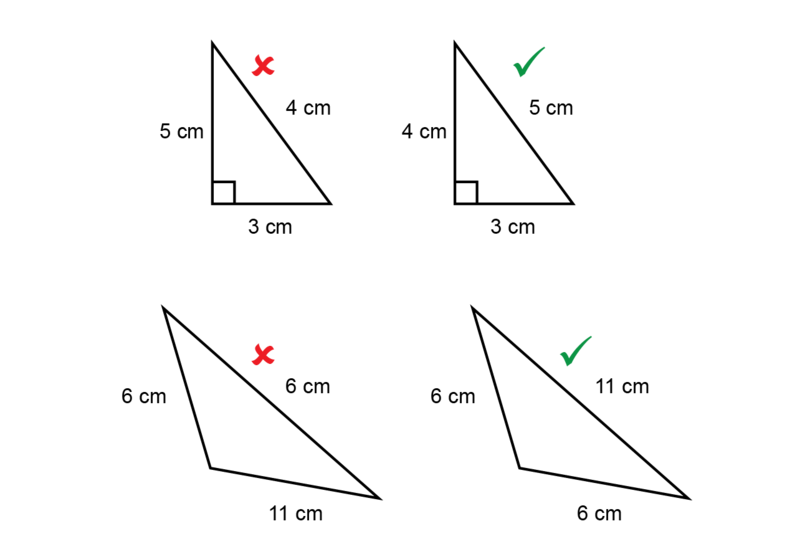
- The longest side of a triangle is opposite the biggest angle of the triangle.
- The shortest side of a triangle is opposite the smallest angle of the triangle.
It is impossible to construct a triangle where the longest side is not opposite the biggest angle.
Construct a triangle given two sides and an included angle
In this section you will construct triangles where you are given two sides of a triangle as well as the included angle.
An included angle is the angle between two sides of a triangle.
In the diagrams below:
- the angle of is included between the sides of 10 cm and 7 cm.
- the angle of is not included between the sides of 10 cm and 7 cm.

included angle An included angle is the angle between two sides of a triangle.
Worked Example 11.1: Constructing a triangle given two sides and an included angle
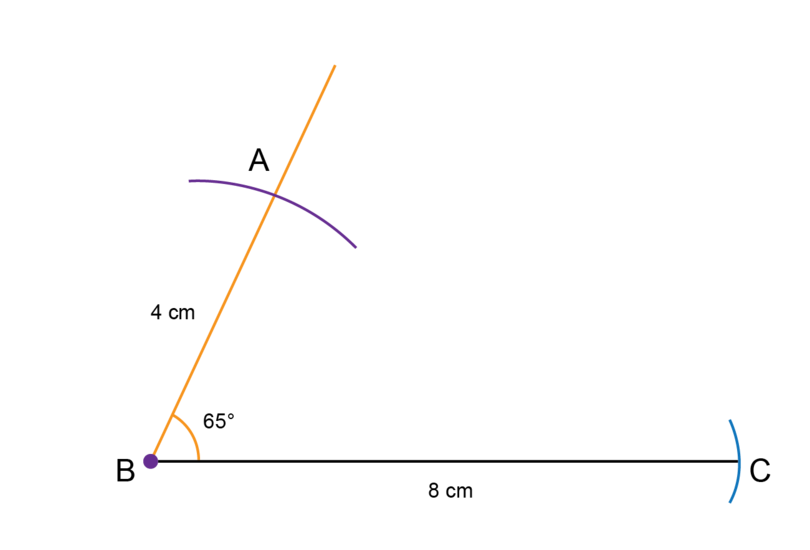
Construct with = 4 cm, = and = 8 cm.
-
Step 1: Make a rough sketch of the triangle first.
Read the given information carefully and fill everything in on the rough sketch. Label the vertices of the triangle.

-
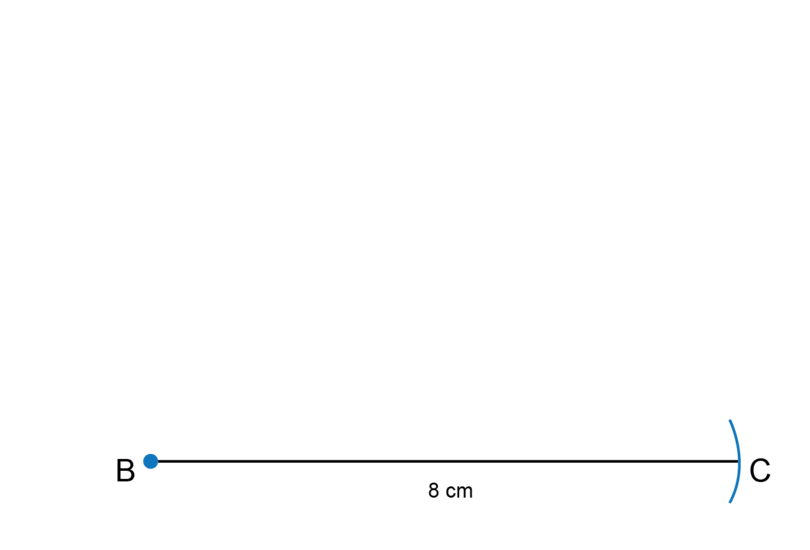
Step 2: Draw a line segment and mark the first side of triangle.
Begin the construction with line segment .
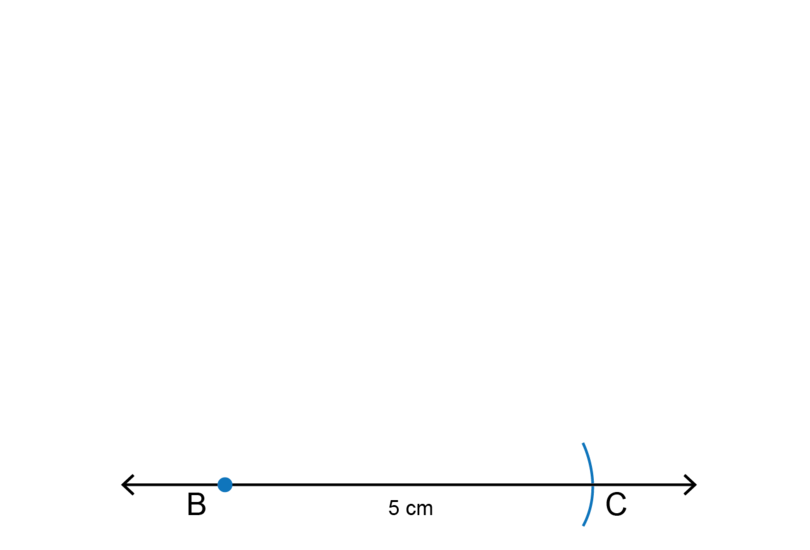
Draw a line segment (longer than 8 cm) and make a dot at point .

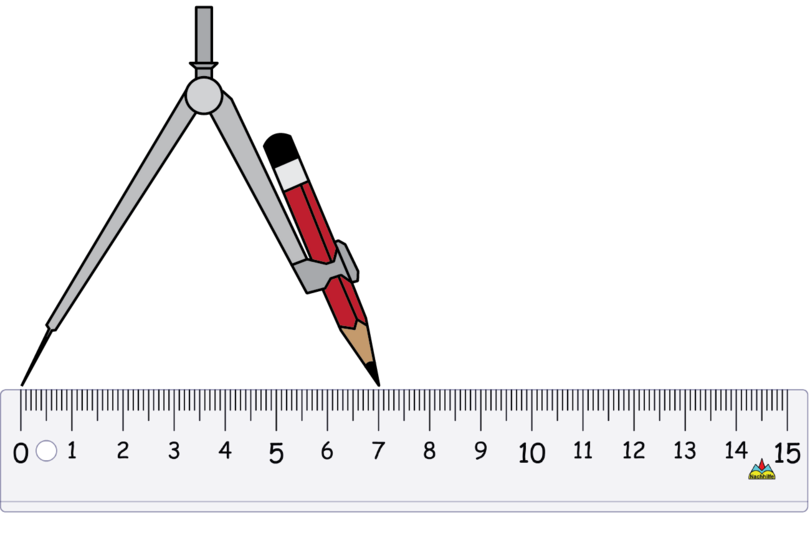
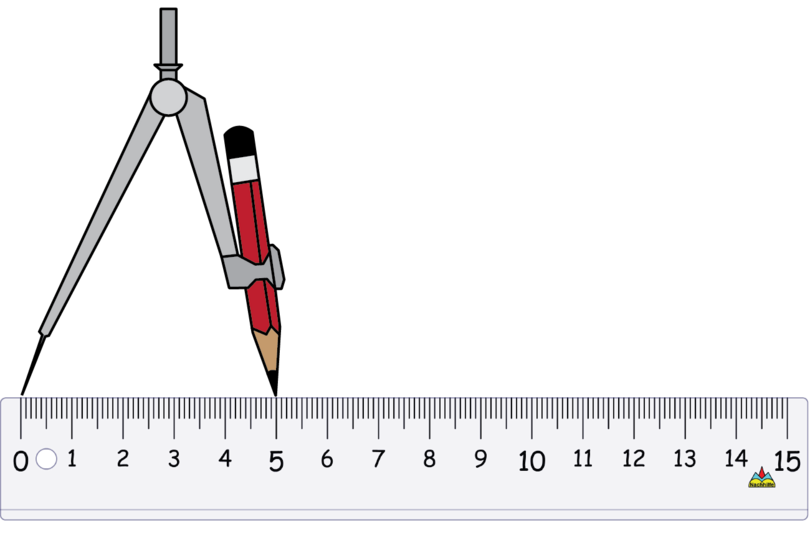
Use the compass to measure a length of 8 cm on your ruler.
Keep the compass open at exactly the same width. Put the point of the compass on point and draw a small arc to mark off a length of 8 cm. Label the point of intersection as point .
-
Step 3: Use a protractor to draw the included angle.
Put the origin of the protractor on point .
Use the inner scale of the protractor and find . Make a small dot at the edge of the protractor to mark where is.
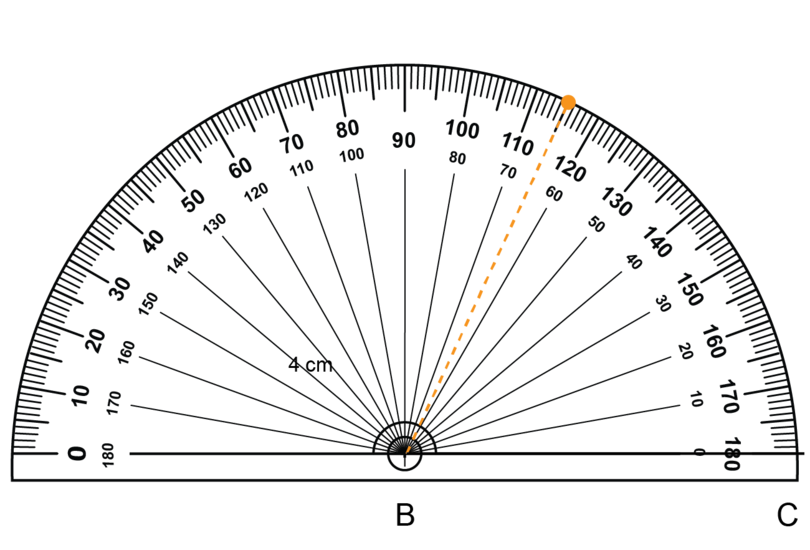
Remove the protractor. Use a ruler to join point to the small dot.
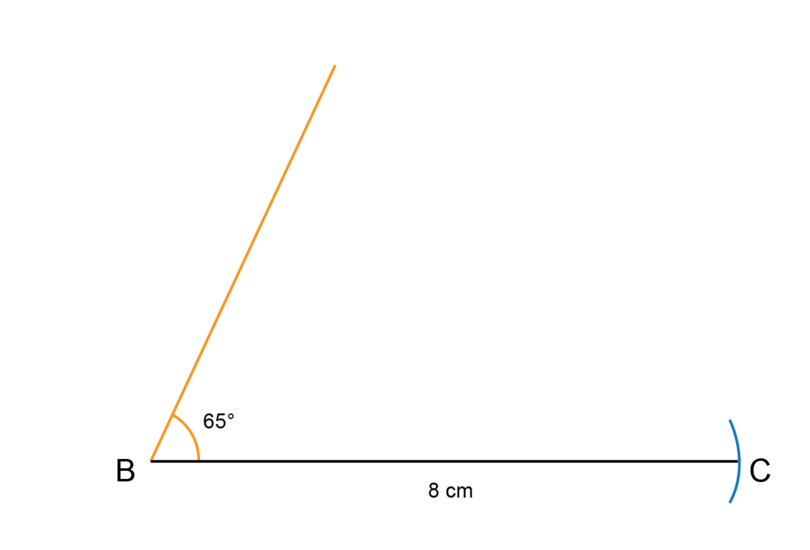
-
Step 4: Measure length of the second side of triangle.
Use the compass to measure a length of 4 cm on your ruler.
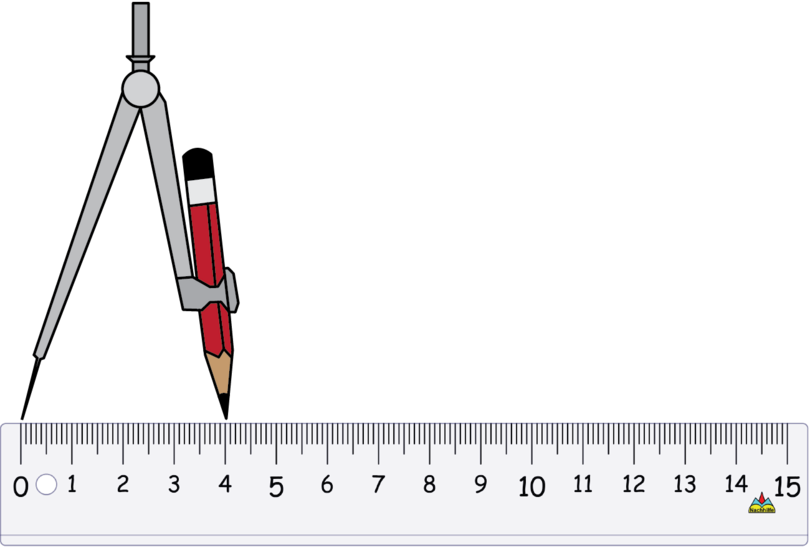
Keep the compass open by exactly the same amount. Put the compass on point and draw a small arc to mark off a length of 4 cm. Label the point of intersection as point .
-
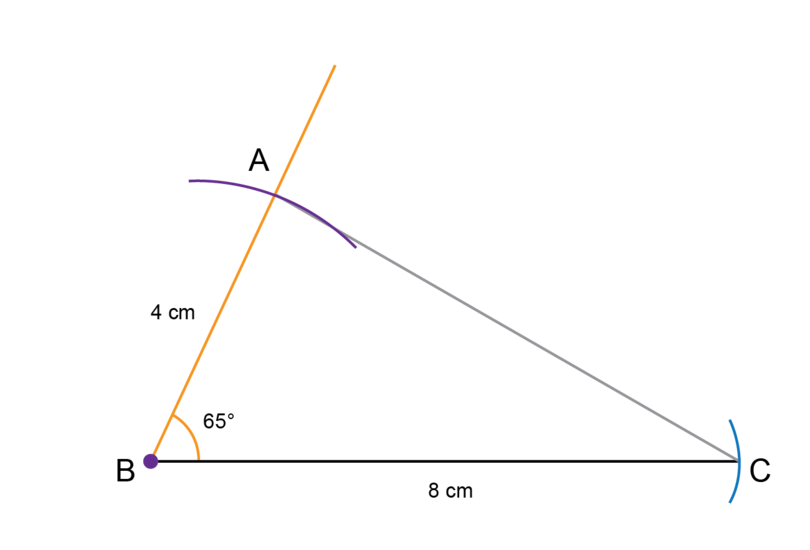
Step 5: Complete the construction.
Use a ruler to join point and point .
-
Step 6: Remember to check your work.
Use a ruler to check that = 4 cm and = 8 cm.
Use a protractor to check that = .
- Never erase the construction lines after you have completed a construction. These may be used in giving marks for your work.
- The constructions provided here may not display at the exact size on all devices. Check your own constructions to make sure they are correct.
Exercise 11.1: Construct a triangle given two sides and an included angle
-
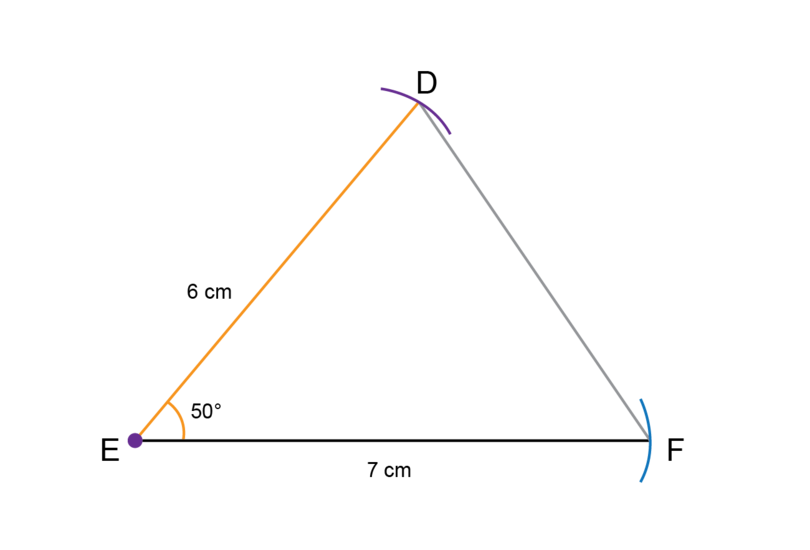
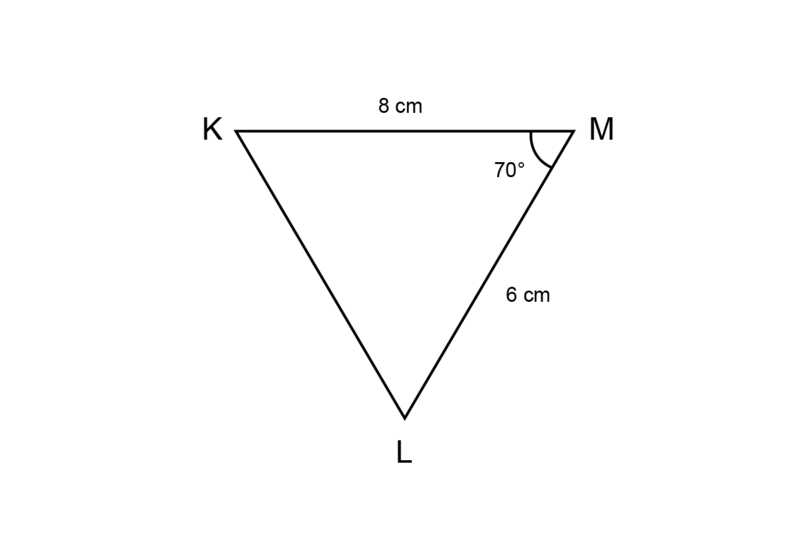
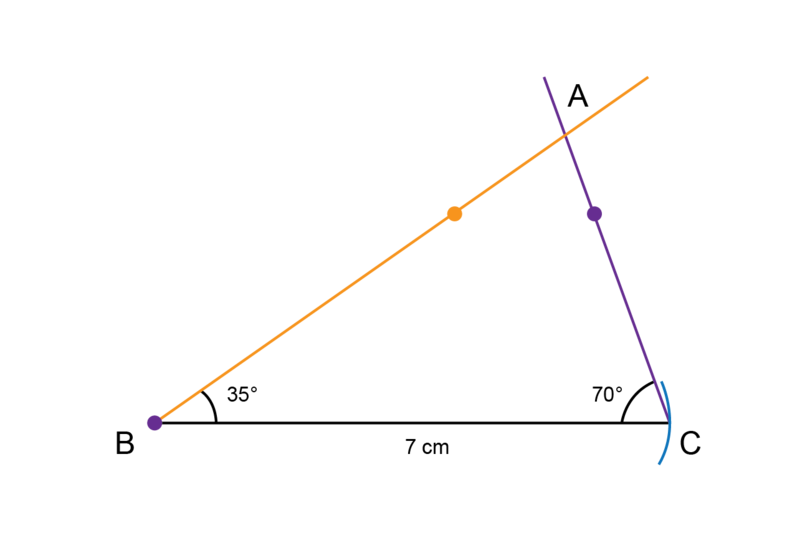
Construct with = 6 cm, = and = 7 cm.
Make a rough sketch first.
Follow the steps given in Worked Example 11.1 to do the construction.
-
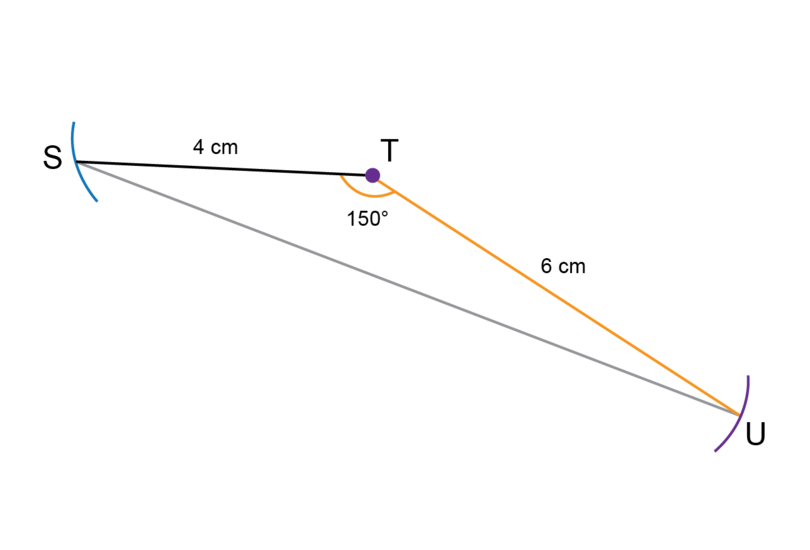
Construct with = 7 cm, = and = 5 cm.
Make a rough sketch first. Remember that an angle of is an obtuse angle.
Follow the steps to do the construction.

-
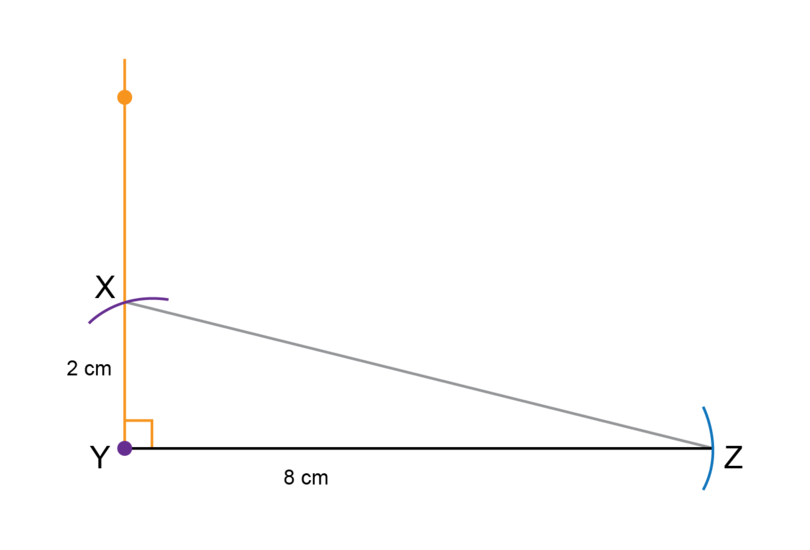
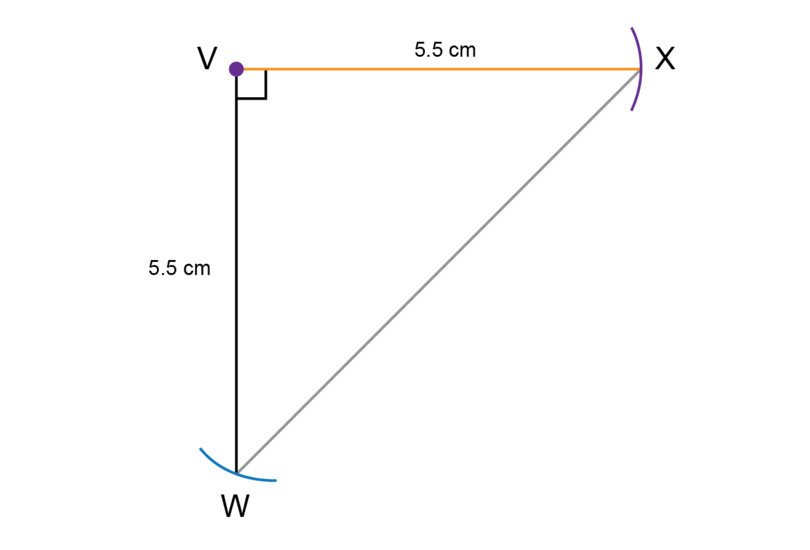
Construct with = 2 cm, = and = 8 cm.
Make a rough sketch first. Remember that an angle of is a right angle.
-
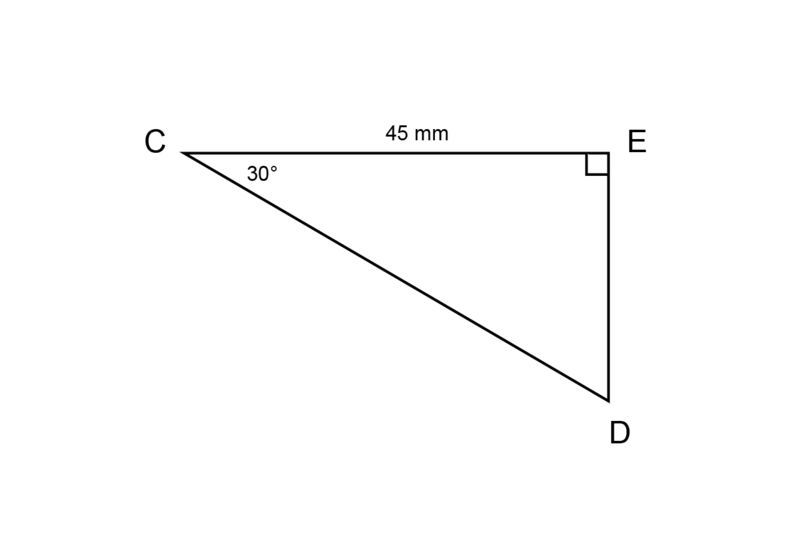
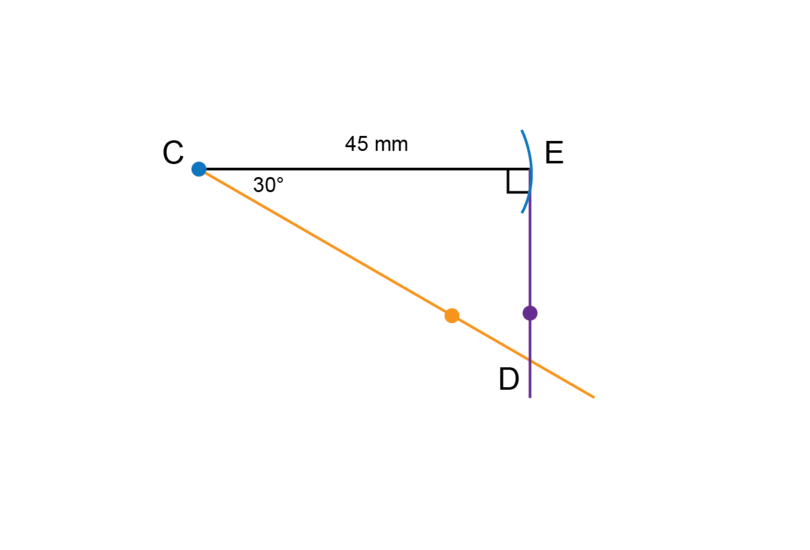
Make an accurate construction of as shown below.
The rough sketch is given to you. Follow the steps to construct a triangle with the dimensions given.

-
Make an accurate construction of as shown below.

The rough sketch is given.
-
Make an accurate construction of as shown below.

- If you have to do a construction involving a line that is not horizontal on the page in front of you, you can turn your workbook.
- Remember never to erase the construction lines after you have completed a construction.
Construct a triangle given two angles and the side between them
In this section you will construct triangles where you are given two angles as well as the length of the side between these two angles.
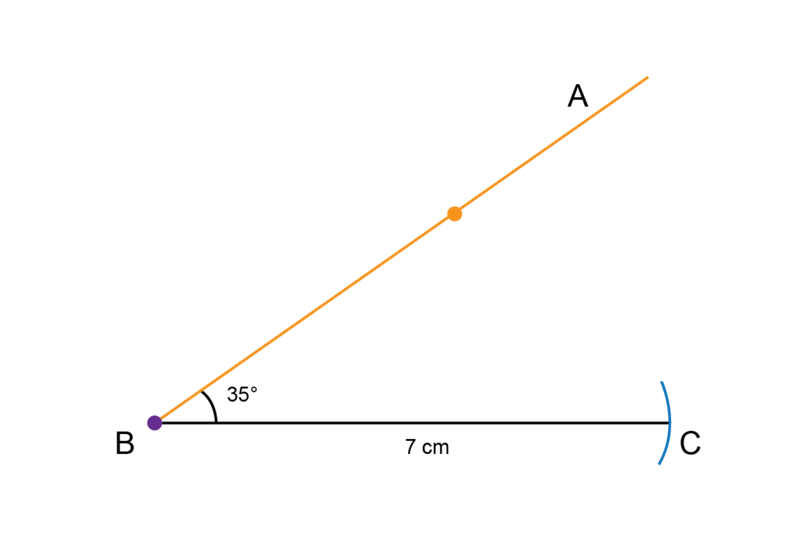
Worked Example 11.2: Constructing a triangle given two angles and the side between them
Construct with = , = 7 cm and = .
-
Step 1: Make a rough sketch of the triangle first.
Read the given information carefully and fill everything in on the rough sketch. Label the vertices of the triangle.

-
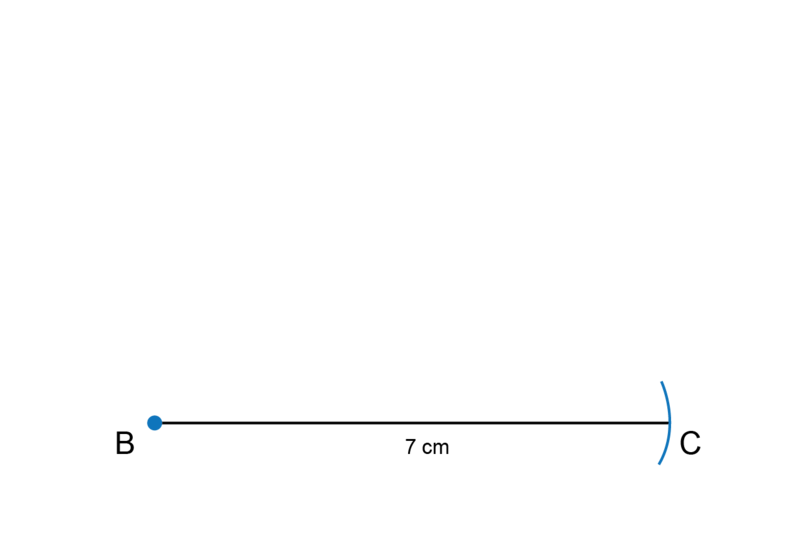
Step 2: Start with the given line length.
Begin the construction with line segment .
Draw a line segment (longer than 7 cm) and make a dot at point .
Use the compass to measure a length of 7 cm on your ruler.
Keep the compass open at exactly the same width. Put the compass on point and draw a small arc to mark off a length of 7 cm. Label the point of intersection as point .
-
Step 3: Use a protractor to draw the first angle.
Put the origin of the protractor on point . Make sure that fits exactly onto the base line of the protractor.
Use the inner scale and find . Make a small dot next to the protractor.
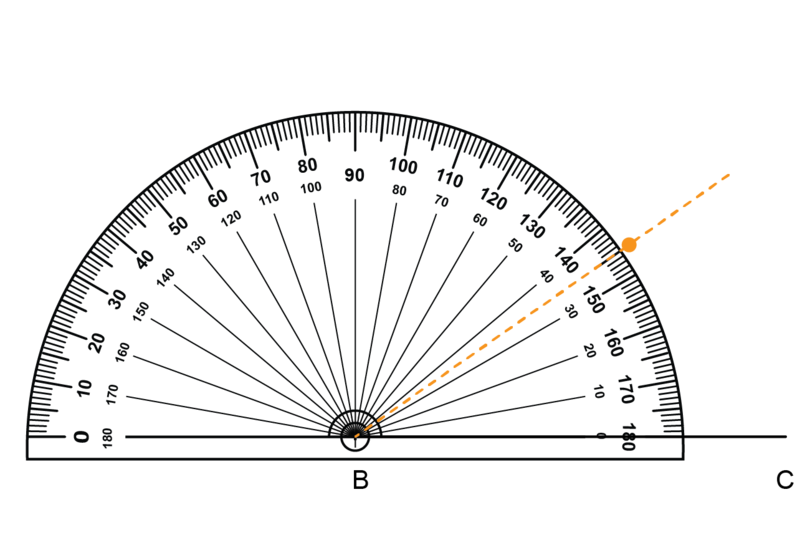
Remove the protractor. Use a ruler to draw a line segment from point B through the small dot.
-
Step 4: Use a protractor to draw the second angle.
Put the origin of the protractor on point . Make sure that fits exactly onto the base line of the protractor.
Use the outer scale and find . Make a small dot next to the protractor.
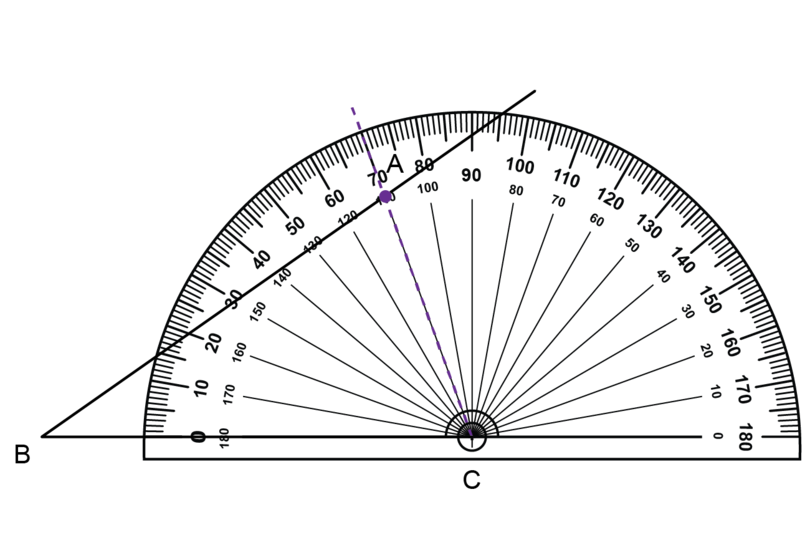
Remove the protractor. Use a ruler to draw a line segment from point C through the small dot.
The lines you have drawn to create your two angles intersect. Label the point of intersection point .
-
Step 5: Remember to check your work.
Use a ruler to check that = 7 cm.
Use a protractor to check that = and that = .
Exercise 11.2: Construct a triangle given two angles and the side between them
-
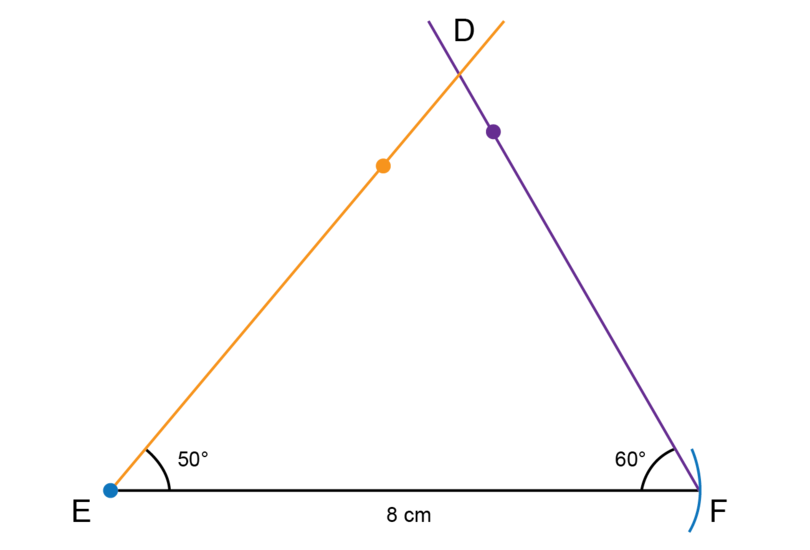
Construct with = , = 8 cm and = .
Make a rough sketch first.
Follow the steps given in Worked Example 11.2 to do the construction.
-
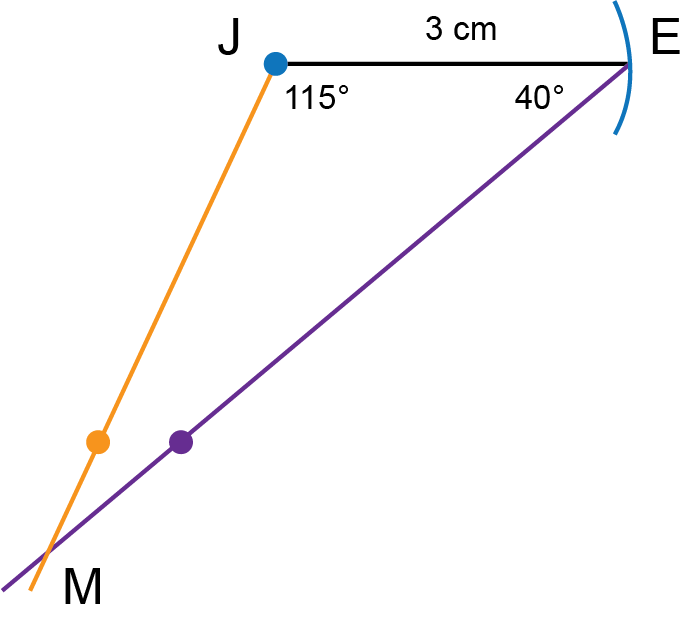
Construct with = , = and = 4 cm.
Remember that an angle of is an obtuse angle.

-
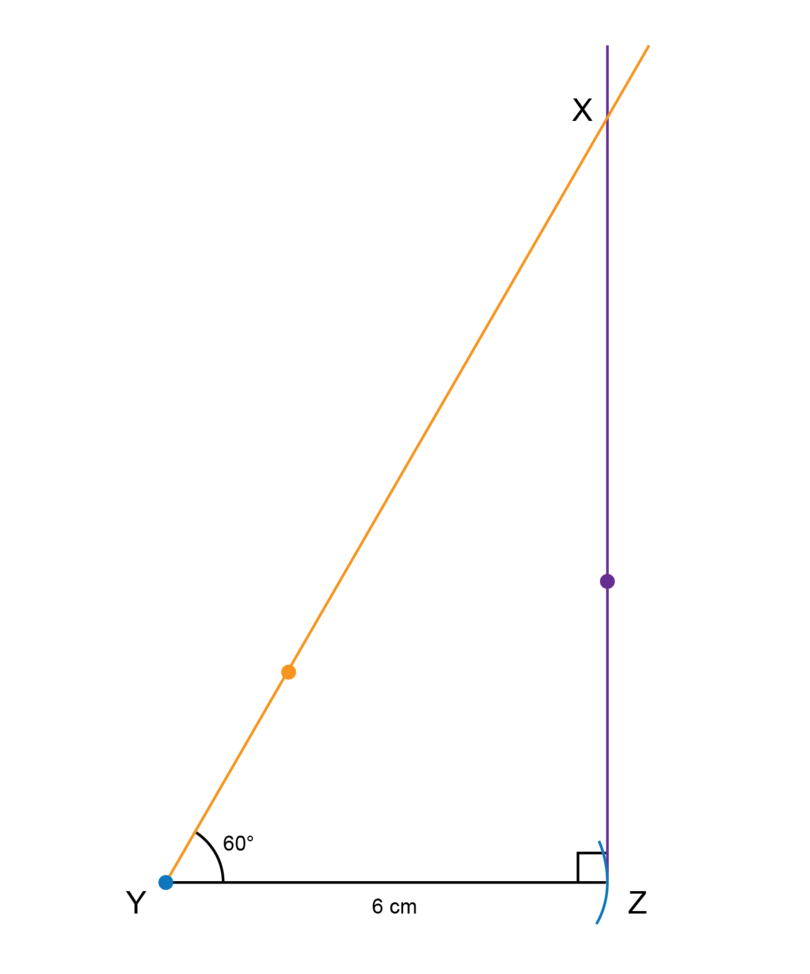
Construct with = 6 cm, = and a right angle.
Remember that a right angle is an angle of .
-
Make an accurate construction of as shown below. (Note: The given diagram is not to scale.)

The rough sketch is given. Follow the steps to construct a triangle that has the given dimensions.

-
Make an accurate construction of as shown below. (Note: The given diagram is not to scale.)

-
Make an accurate construction of as shown below. (Note: The given diagram is not to scale.)
-
Explain why it is impossible to construct if = , = 7.5 cm and = .
It is impossible to construct because a triangle can have only one obtuse angle. The information that is given cannot be used to construct a triangle.
Construct a triangle given all three sides
In this section you will construct triangles where you are given all three sides of a triangle.
There are different methods to label the sides of a triangle. For example, the sides of can be labelled as follows:
Side
is the side opposite
. Side
can also be labelled as c.
Side
is the side opposite
. Side
can also be labelled as a.
Side
is the side opposite
. Side
can also be labelled as b.

Worked Example 11.3: Constructing a triangle given all three sides
Construct with a = 5 cm, b = 7 cm and c = 6 cm.
-
Step 1: Make a rough sketch of the triangle first.
Read the given information carefully and fill everything in on the rough sketch. Label the vertices of the triangle.

-
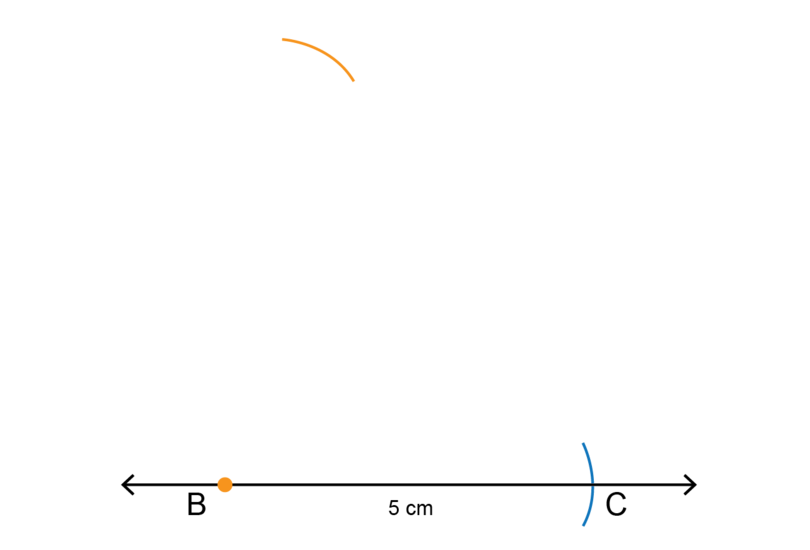
Step 2: Draw a line segment and mark first side of triangle.
Begin the construction with line segment .
Draw a line segment (longer than 5 cm) and make a dot at point .
Use the compass to measure a length of 5 cm on your ruler.
Keep the compass open at exactly the same width. Put the compass on point and draw a small arc to mark off a length of 5 cm. Label the point of intersection as point .
-
Step 3: Draw an arc to mark the length of the second side of the triangle.
Use the compass to measure a length of 6 cm on your ruler.
Keep the compass open at exactly the same width. Put the compass on point and draw a small arc to mark off a length of 6 cm.
-
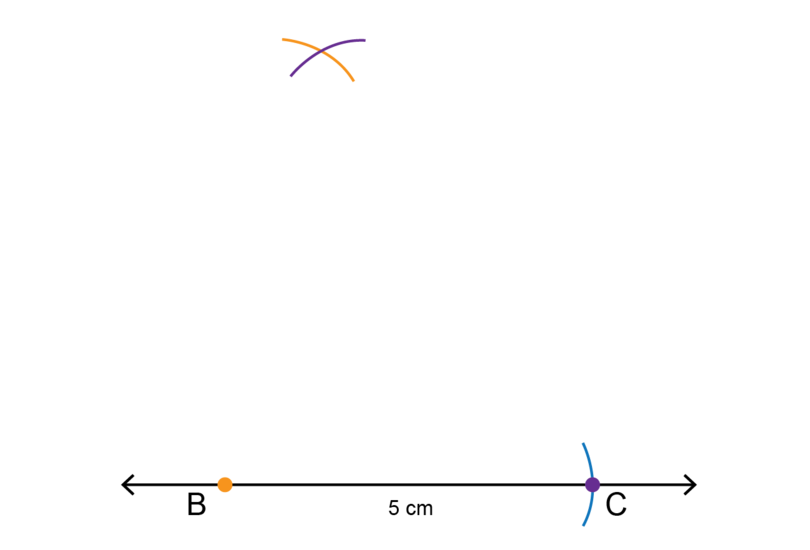
Step 4: Draw an arc to mark the length of the third side of the triangle.
Use the compass to measure a length of 7 cm on your ruler.
Keep the compass open by exactly the same amount. Put the compass on point and draw a small arc to mark off a length of 7 cm.
-
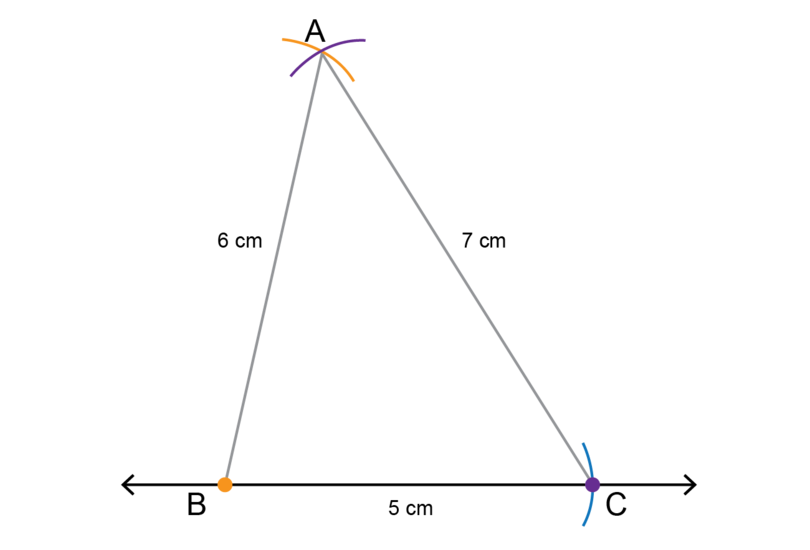
Step 5: Complete the construction.
Label the point of intersection between the two arcs (of Step 3 and Step 4) as point .
Use a ruler and join point and point .
Use a ruler and join point and point .
-
Step 6: Remember to check your construction.
Use a ruler to check if = 6 cm, = 5 cm and = 7 cm.
Never erase the construction lines after you have completed a construction.
Exercise 11.3: Construct a triangle given all three sides
-
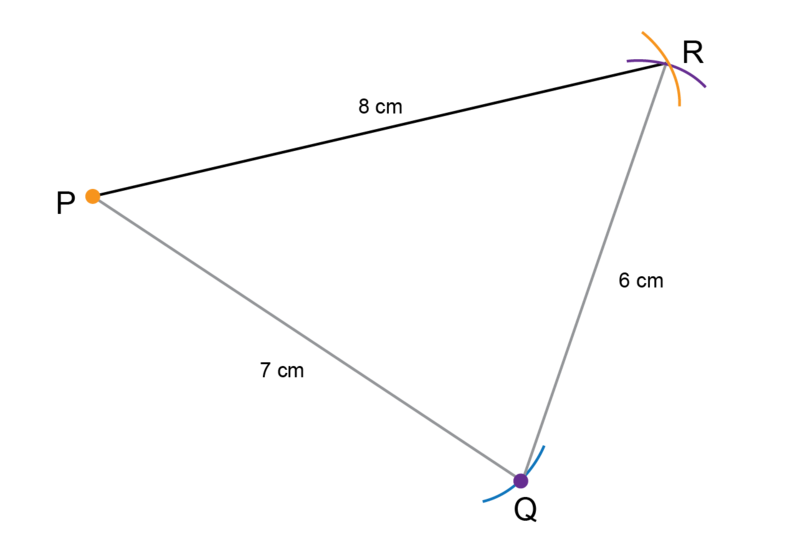
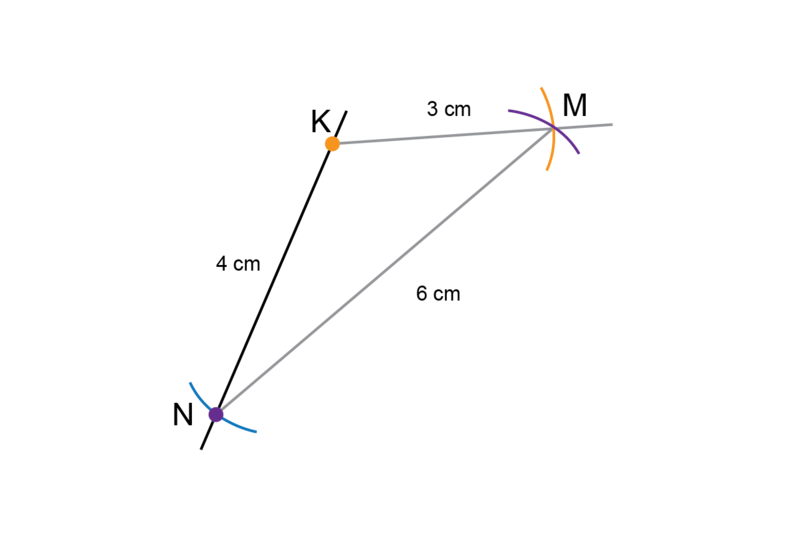
Consider and in the diagrams below. (Note: The given diagrams are not to scale.)

- What is the length of side ?
8 cm
- What is the length of side q?
8 cm
- What is the length of side ?
4 cm
- What is the length of side k?
6 cm
- What side has a length of 7 cm? (Use two different notations to give the answer.)
= r = 7 cm
- What side has a length of 3 cm? (Use two different notations to give the answer.)
= n = 3 cm
- Make an accurate construction of . A rough sketch of is given in number 1 of this exercise.
Follow the steps given in Worked Example 11.3 to do the construction. You can start with any of the line segments. The solution shown started from .
- Make an accurate construction of . A rough sketch of is given in number 1 of this exercise.
Follow the steps to do the construction. You can start with any of the line segments. The solution shown started from .
- Make an accurate construction of with d = 10 cm, e = 8 cm and f = 6 cm. Give the size of by measuring it with a protractor.
Follow the steps to do the construction.
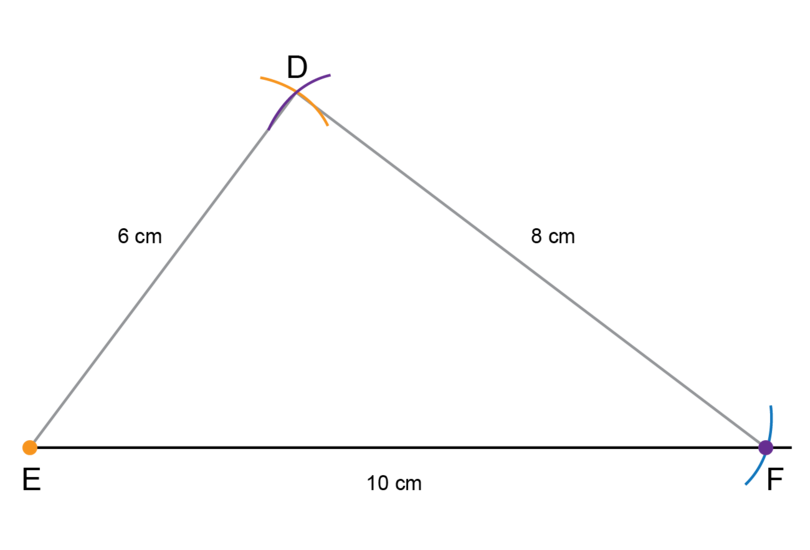
=
- Make an accurate construction of with s = 4 cm, and t = u = 7 cm. What type of triangle is ?

is an isosceles triangle, because two of the sides are the same length.
- Explain why it is impossible to construct if = 2 cm, = 15 cm and = 3 cm.
It is impossible to construct . The arcs drawn for the sides of 2 cm and 3 cm will not intersect each other, because 15 cm is much longer than 5 cm (2 cm + 3 cm = 5 cm).
11.2 Bisect angles
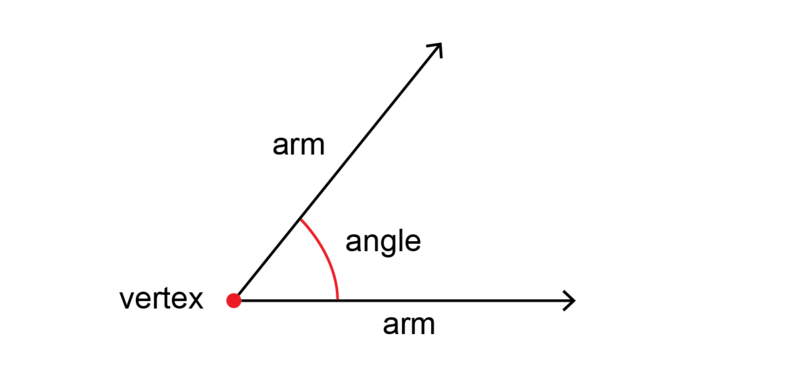
An angle is the amount of turn between two straight lines that have a common end point. The common end point is called the vertex of the angle.
When we bisect an angle, we divide the amount of turn into two equal halves without actually measuring the angle. The line that divides the angle is called a bisector (or an angle bisector).
bisect When we bisect an angle, we divide the angle into two equal halves.
bisector The bisector (or angle bisector) is the line that divides an angle into two equal halves.
The construction in this section is based on the properties of a circle.
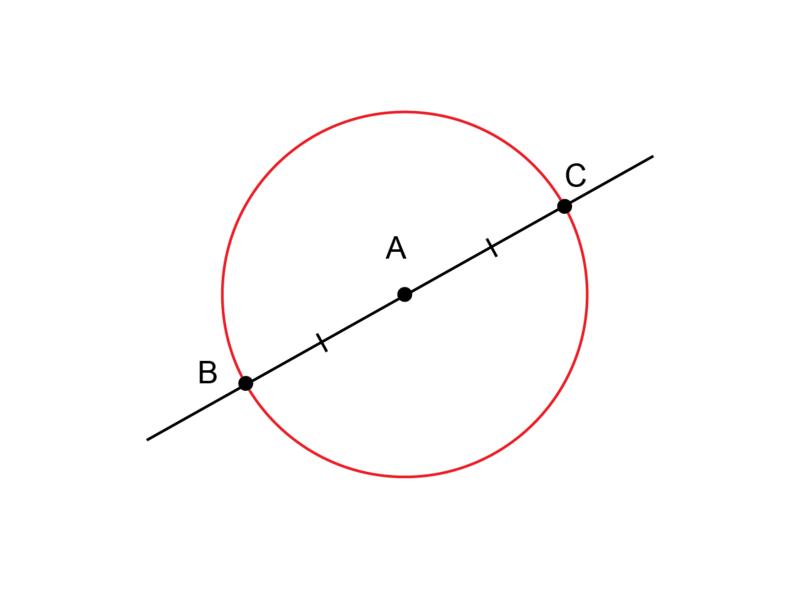
In the diagram below is the diameter of the circle. is the centre of the circle.
This means that is a radius of the circle and is also a radius of the circle. So, is equal to .
When we do constructions we often do not draw a complete circle.
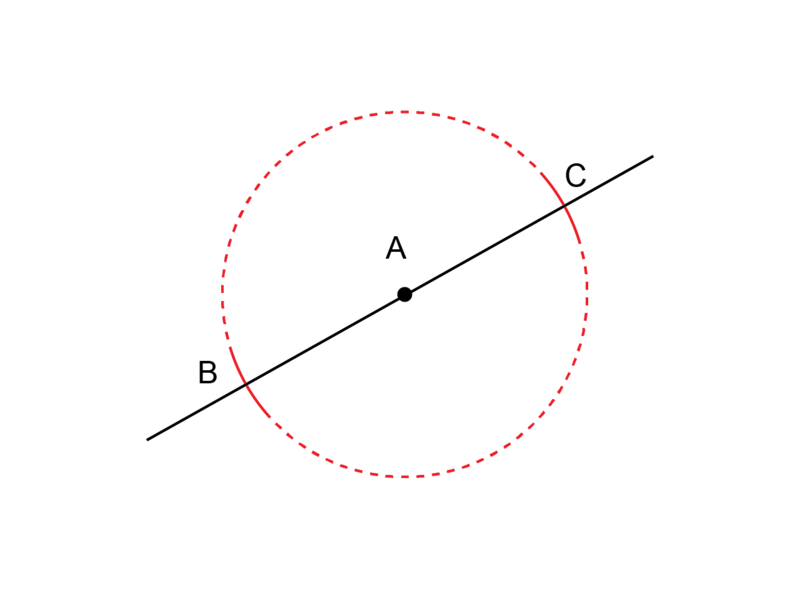
The parts of the circumference that are left are called arcs. An arc is part of the circumference of a circle.

arc An arc is part of the circumference of a circle.
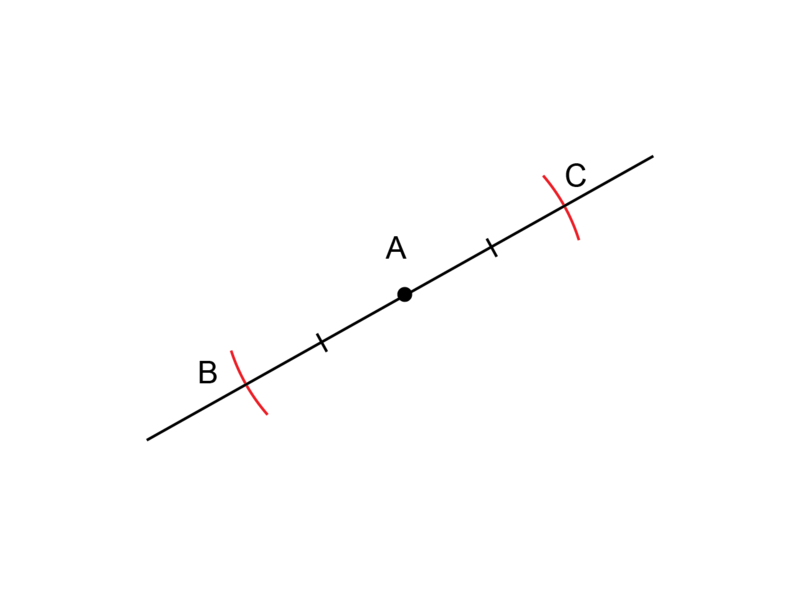
We will draw arcs when we bisect an angle. It is important to remember that if we draw two arcs while keeping our compass open at exactly the same width, then we are drawing two radiuses with equal lengths. is still a radius of the circle, and is still a radius of the circle. So, is equal to even if we did not draw a complete circle.
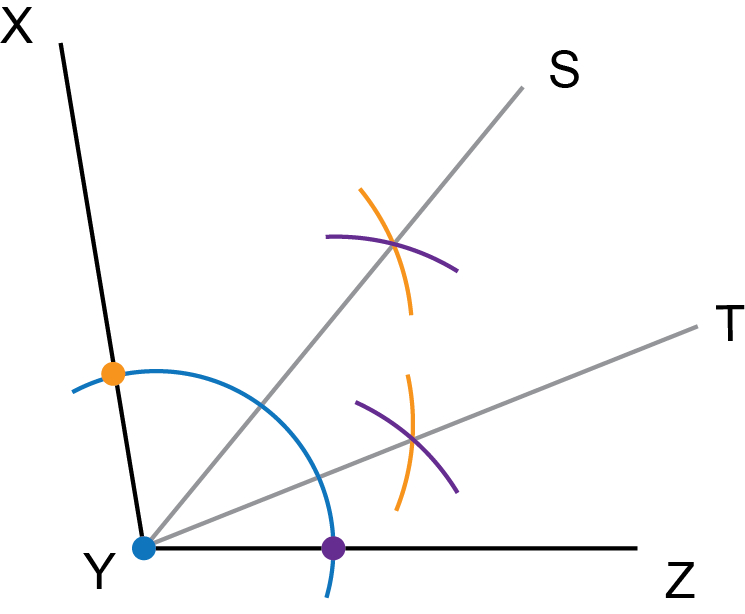
Worked example 11.4: Bisecting an acute angle
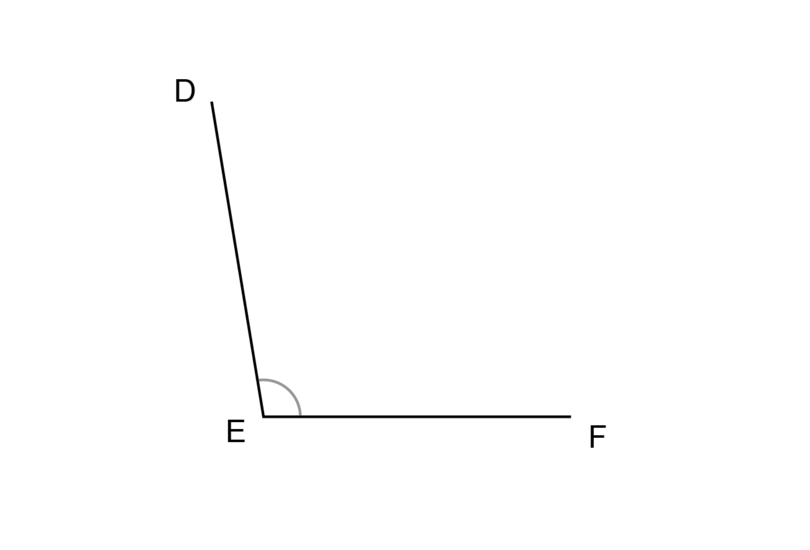
is an acute angle. Use a compass and a ruler to bisect .
Remember that an acute angle is an angle that is between and .
-
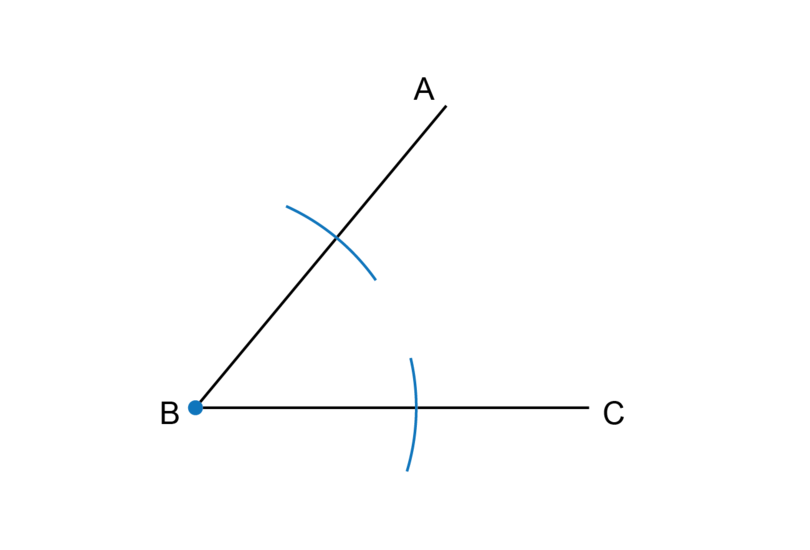
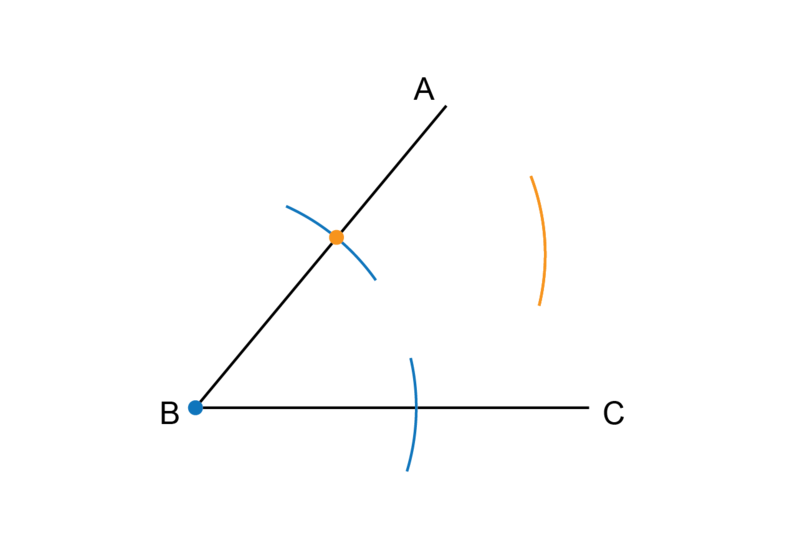
Step 1: Draw the first two arcs.
Put the compass on point (the blue dot). Point is the vertex of the angle. Keep the compass at the same width and draw two arcs to intersect with the two arms of the angle.
-
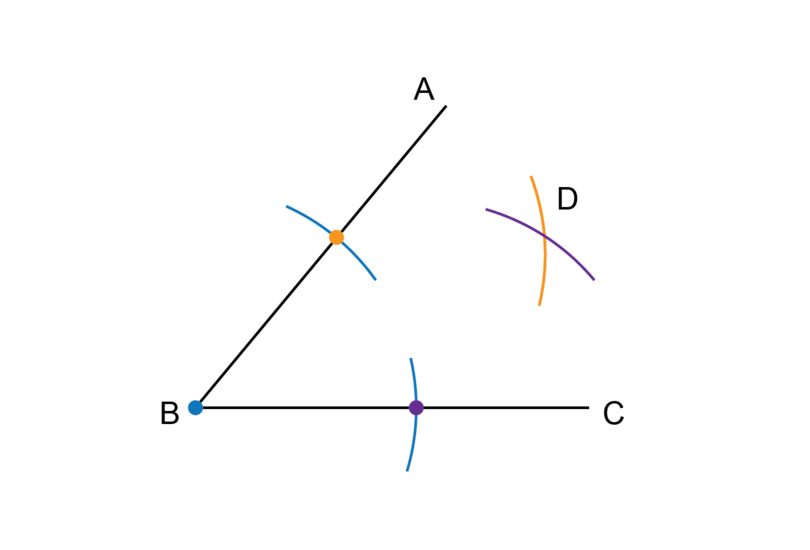
Step 2: Draw the third arc.
Put the compass on the point where the arc from Step 1 crosses (the orange dot) and draw an arc as shown.
-
Step 3: Draw the fourth arc.
Keep the compass at the same width as for Step 2. Put the point of the compass on the point where the arc from Step 1 crosses (the purple dot) and draw an arc as shown.
-
Step 4: Complete the construction.
Label the point of intersection between the two arcs as point .
Use a ruler to draw a line segment from point through point .
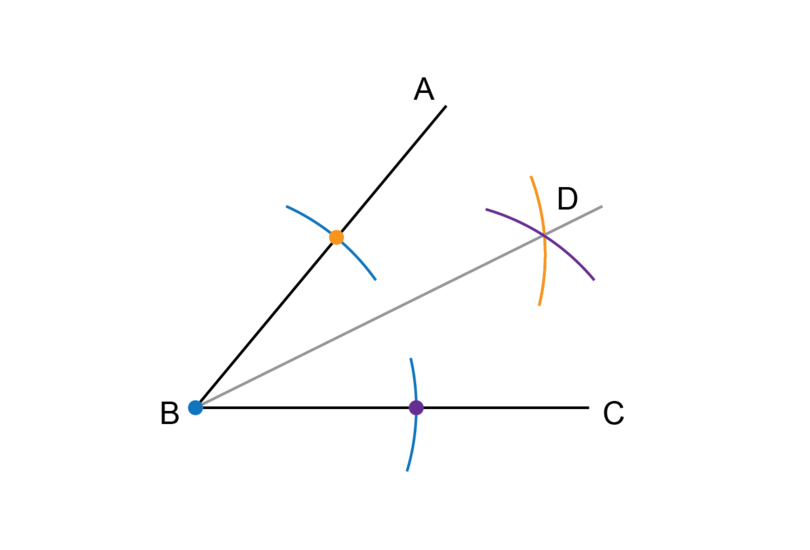
is the bisector of .
-
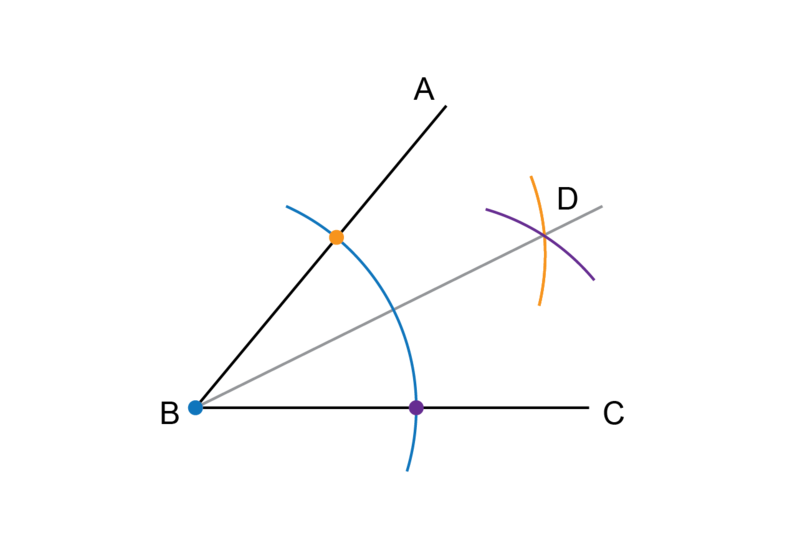
Step 5: Check your work.
Use a protractor to measure the two angles. Each one of them should be exactly half of the given angle.
= = . = , so we have bisected the angle.
If you find it easier, you may begin the construction with one big arc instead of the two smaller arcs.
In the worked example above, an acute angle was bisected. You use exactly the same steps to bisect any type of angle. Next, we will bisect a reflex angle.
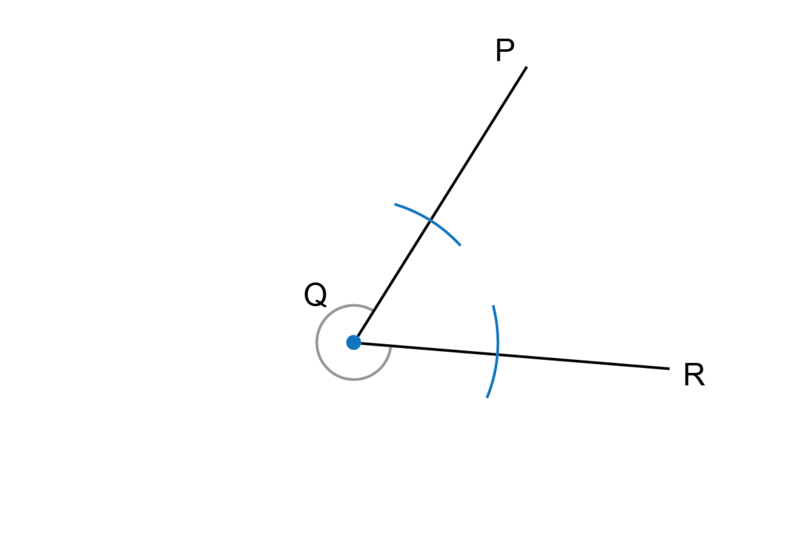
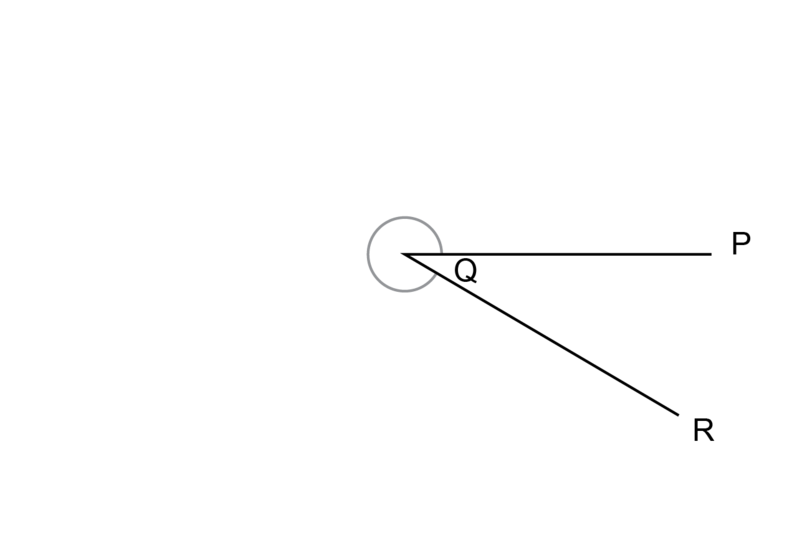
Worked Example 11.5: Bisecting a reflex angle
is a reflex angle. Use a compass and a ruler to bisect .

Remember that a reflex angle is between and .
-
Step 1: Draw the first two arcs.
Put the compass on point (the blue dot). Point is the vertex of the angle. Keep the compass at the same width and draw two arcs to intersect with the two arms of the angle.
-
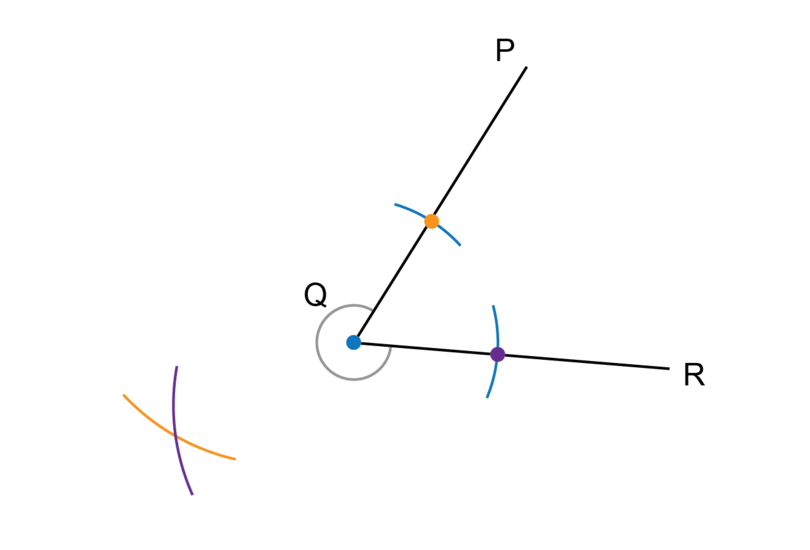
Step 2: Draw the third arc.
Put the compass on the point where the arc from Step 1 crosses (the orange dot) and draw an arc as shown.

-
Step 3: Draw the fourth arc.
Keep the compass at the same width as for Step 2. Put the compass on the point where the arc from Step 1 crosses (the purple dot) and draw an arc as shown.
-
Step 4: Complete the construction.
Label the point of intersection between the two arcs as point .
Use a ruler to draw a line segment from point through point .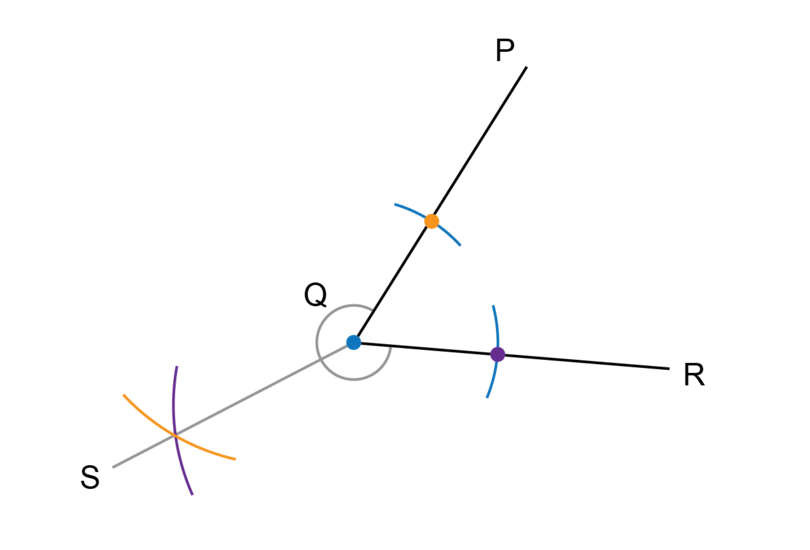
is the bisector of .
-
Step 5: Check your work.
Use a protractor to measure the two angles. Each one of them should be exactly half of the given angle.
= = . = , so we have bisected the angle.
You can also bisect a reflex angle by bisecting the acute angle, and then producing (making longer) this bisector. You need to continue the line through the vertex to the other side, and this will give you the bisector of the reflex angle.
In the diagram below, is the bisector of acute , and is the bisector of reflex . and form a straight line.
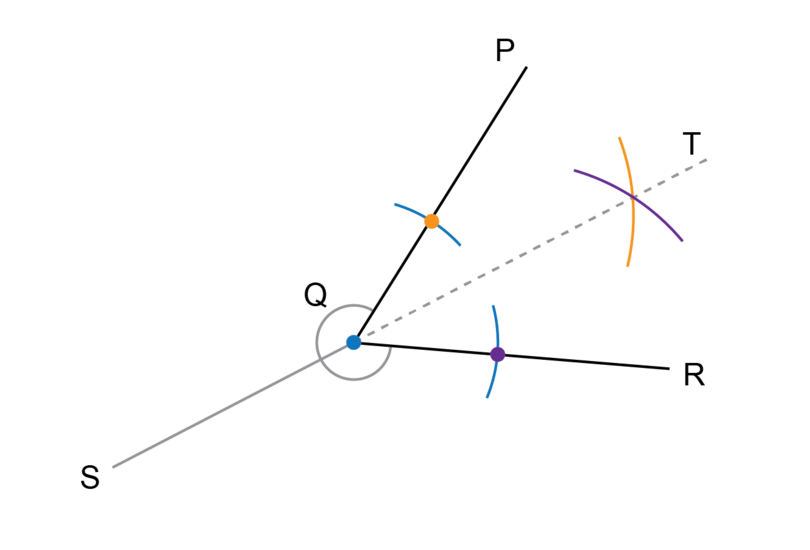
Remember not to erase the construction lines after you have completed a construction.
Exercise 11.4: Bisect an angle
-
The diagram below shows an acute angle. Use a compass and ruler to bisect . Label the bisector .

Measure and write down the sizes of and .
Follow the steps in Worked Example 11.4 to do the construction.
= =
-
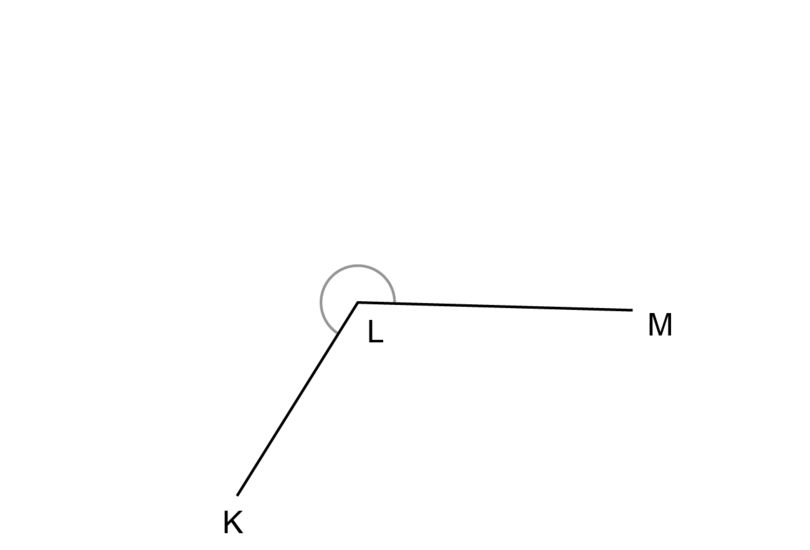
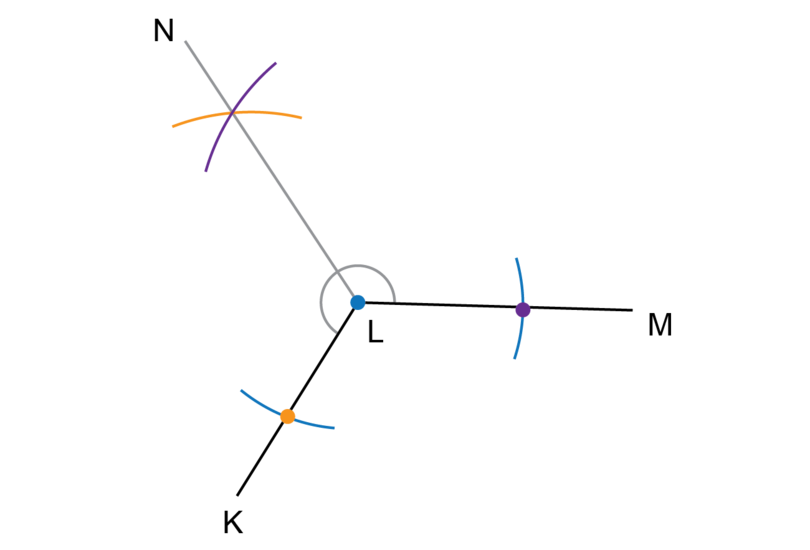
The diagram below shows an obtuse angle. Use a compass and ruler to bisect . Label the bisector .
Measure and write down the sizes of and .

= =
-
Draw your own straight . Bisect and label the bisector . What type of angles are and ?
A straight angle is a straight line. Follow the steps to bisect the angle.
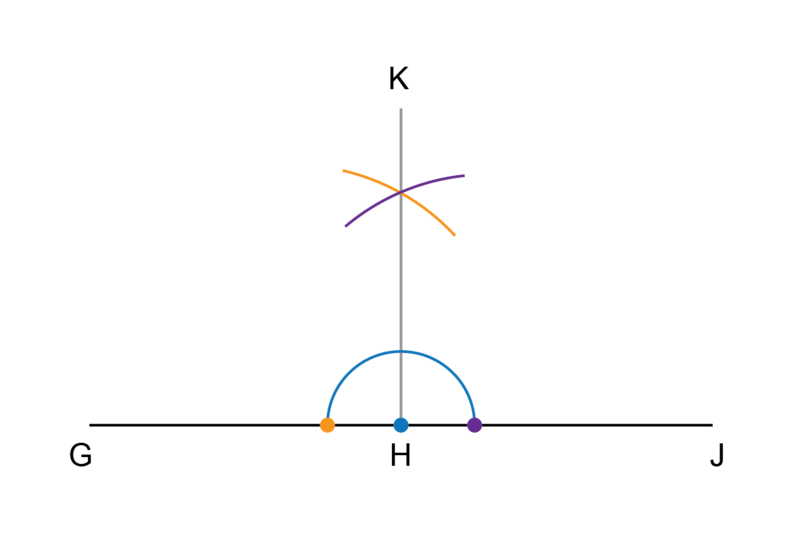
and are right angles. = =
-
The diagram below shows a reflex angle. Use a compass and ruler to bisect . Label the bisector .
What type of angle is ?
Follow the steps in Worked Example 11.5 to do the construction.
is an obtuse angle.
-
The diagram below shows a reflex angle. Use a compass and ruler to bisect . Label the bisector .
What type of angle is reflex together with acute ?

Reflex + acute = . This angle is a revolution.
-
Draw your own obtuse . Construct angle bisectors to find an angle that is one quarter of .
An obtuse angle is between and . You may draw any obtuse angle. An example is given in the solution below.
Bisect and label the bisector .

Bisect any one of the two smaller angles again. In the diagram below, is bisected.
is one quarter of , and is also one quarter of .
-
Draw a big triangle with three acute angles and label the triangle . Construct the bisectors for , and . What do you notice about the three bisectors?
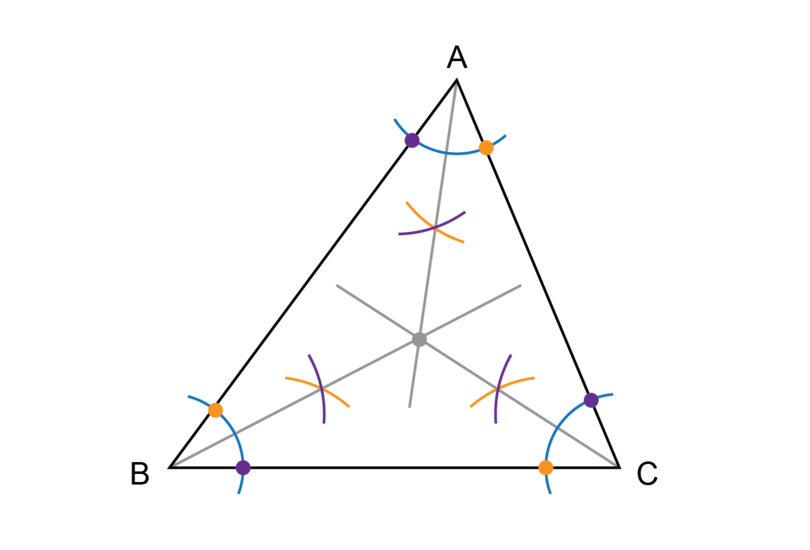
The three angle bisectors meet each other at one single point.
11.3 Summary
- A construction in Mathematics is an accurate drawing of angles and lines.
- We use arcs in many constructions. An arc is part of the circumference of a circle.
- Using a compass, protractor, ruler and pencil, we can carry out the following constructions:
- Construct a triangle given two sides and an included angle
- Construct a triangle given two angles and the side between them
- Construct a triangle given all three sides
- To construct an angle bisector, you may only use a compass, ruler and pencil. You may use a protractor to check that you have bisected the angle.
- It can be helpful is a good idea to rotate your workbook if you have to do a construction involving a line that is not horizontal on the page in front of you.
- Never erase the construction lines after you have completed a construction.